You’ll need about ⅛ teaspoon of baking soda per ¼ cup of sugar for perfect dalgona. This ratio triggers rapid foaming when you add it to melted caramel, creating that signature light, airy texture. Too much baking soda causes over-aeration and a pancake-like result; too little yields dense candy. After melting sugar to golden amber, remove it from heat, add baking soda immediately, and stir for five seconds. The mixture expands roughly four times as carbon dioxide gas releases, forming a honeycomb structure. Getting this ratio right transforms your entire outcome.
Why Baking Soda Amount Matters for Perfect Dalgona Texture

Getting the baking soda amount right is what separates a crispy, shattered candy from a dense, pancake-like mess. You need a precise ratio to achieve that signature light, airy dalgona texture. The formula is simple: use about 1/8 teaspoon of baking soda per tablespoon of melted sugar. This measurement creates the rapid foaming action that gives dalgona its distinctive crunch.
When you add too much baking soda, the mixture over-fluffs aggressively. The result? A browning or pale candy that resembles pancake toffee instead of crisp candy. The leavener causes excessive expansion, ruining your texture entirely.
Getting this balance right means you’re joining countless others who’ve mastered this tricky step. The precise ratio ensures consistent, professional results every batch.
The Right Ratio: ⅛ Teaspoon Baking Soda Per ¼ Cup Sugar

You’ll want to follow the ⅛ teaspoon of baking soda per ¼ cup of sugar ratio, which prevents your dalgona from expanding too much and developing that undesirable pancake-like texture. When you measure precisely at this ratio, you’re ensuring even foaming that creates the light, fluffy consistency you’re after, while avoiding the darker browning that comes from using too much baking soda. If you’re working with smaller portions like 2 tablespoons of sugar, you’ll scale down to about 1/16 teaspoon, maintaining the same balanced proportions that deliver perfect results every time.
Ratio Prevents Pancake Texture
What’s the secret to dalgona that’s light and airy instead of dense and flat? It’s mastering your baking soda ratio. You’ll want exactly ⅛ teaspoon per ¼ cup sugar—this precise proportion creates the perfect chemical reaction that lifts your candy without overdoing it.
When you maintain this baking soda ratio, the sugar-baking soda interaction generates controlled foaming that aerates your dalgona evenly. You’re preventing pancake texture prevention by allowing just enough gas production to create those signature air pockets.
Exceeding this ratio causes problems. Too much baking soda triggers excessive foaming, resulting in an unpleasantly foamy texture and potential burning. Conversely, using less baking soda leaves you with denser dalgona candy consistency that won’t aerate properly.
Consistency matters when scaling recipes. Keep this ratio constant across batches for uniform, perfectly textured results every time.
Measuring For Perfect Fluff
How do you nail the texture every single time? You’ll want to master the baking soda ratio that separates success from disappointment. The magic measurement is ⅛ teaspoon of baking soda per ¼ cup of granulated sugar. This specific ratio—about 0.5 to 0.6 grams—creates the light, airy dalgona texture you’re after.
Measurement precision matters more than you’d think. When you use exactly this amount, the baking soda releases the right amount of gas during heating. This creates those delicate air pockets that give dalgona its signature fluffy structure. Scale this ratio proportionally if you’re making larger batches. Keep the 1:2 volume ratio consistent. Exceeding it darkens your sugar, traps too much gas internally, and shifts both flavor and texture. You’ll get pancake-like toffee instead of the crispy-yet-airy candy you want. Stick to the precise measurement, and you’ll join those who master dalgona consistently.
Adjusting Beyond Standard Portions
Scaling your dalgona recipe up or down doesn’t mean guessing at measurements—it means holding tight to that foundational 1:2 ratio of baking soda to sugar. You’ll maintain texture control by keeping this baking soda ratio consistent across any portion size.
If you’re doubling your batch, use ¼ teaspoon baking soda with ½ cup sugar. Halving it? Use 1/16 teaspoon with ⅛ cup sugar. This scaling dalgona approach ensures you get that same light, fluffy texture every time.
Deviating from this ratio creates problems. Less baking soda yields denser candy. More causes over-aeration and unwanted darkening. The ratio works because it controls how much gas releases into your mixture, directly affecting your final product’s structure and appearance.
Step 1: Measure Your Sugar and Prepare Your Workspace

You’ll want to gather your ingredients and set up properly before you begin, since the process moves quickly once the sugar starts melting. Measure out your sugar first—you’ll typically need 2–3 tablespoons for a standard batch of dalgona candy. Have your baking soda ready nearby, using about 1/8 teaspoon per batch.
Next, prepare your workspace by lining it with parchment paper. This setup matters because when sugar melts, you won’t have time to scramble for materials. The parchment gives you a clean surface for quick transfer once you’ve added the baking soda and stirred the mixture. Keep everything within arm’s reach. A clear, organized workspace ensures smooth execution and prevents mistakes during those critical final seconds when your dalgona transforms from liquid to fluffy candy.
Step 2: Melt Sugar to Golden Amber Without Stirring
With your workspace ready, it’s time to heat the sugar. Place your sugar in a heavy-bottomed pan over medium-high heat. Resist the urge to stir at the start—this allows even color development along the edges. Watch carefully as the sugar transitions from clear to light amber, your signal that caramelization is complete.
| Heat Stage | Temperature Indicator | Action Required |
|---|---|---|
| Initial | Sugar begins melting | Use medium-high heat |
| Mid-process | Edges turn golden | Reduce to medium-low |
| Final | Light amber appears | Turn off heat immediately |
Once amber color appears, remove the pan promptly. Overcooking damages texture and flavor. Heat control prevents burning while ensuring proper caramelization. This careful monitoring during sugar melting determines your dalgona’s success, so stay focused throughout this critical step.
Step 3: Remove From Heat Before Adding Baking Soda

You’ll want to remove your pan from the heat the moment your sugar reaches that golden amber color, because adding baking soda to hot sugar causes it to foam excessively and darken further. This timing matters because the residual heat alone will continue cooking your sugar, so you’re actually catching it at the right moment when you pull it off the flame. Off the heat, you’ll have better control when the baking soda hits the sugar, which prevents that dense, pancake-like texture and gives you the light, whipped consistency that makes Dalgona special.
Timing The Heat Removal
Once your sugar reaches a light amber color, it’s time to pull the pan away from the heat source immediately. This baking soda timing is critical for success. You’re preventing the sugar from darkening further on the hot surface, which would compromise your final candy’s appearance and taste.
Here’s why heat removal matters: the pan retains residual heat even off the burner. If you wait too long, the sugar continues caramelizing, turning darker and developing a bitter flavor. You’ll also lose that desirable light, whipped texture you’re aiming for.
Remove the pan, then add your baking soda within seconds. This texture preservation technique ensures the baking soda activates properly without burning. Stir quickly for about five seconds. You’ve now created the ideal conditions for perfect dalgona every time.
Preventing Sugar Darkening
Timing your heat removal is absolutely critical—it’s the difference between light, fluffy dalgona and dark, bitter candy. You need to pull the pan from heat just before adding baking soda. This prevents continued sugar caramelization, which darkens your mixture and ruins the delicate texture you’re after.
When you remove the pan from heat, the residual warmth still works on your sugar. Waiting those few seconds lets it cool slightly while you prepare the baking soda. This cooling window is essential for achieving light color dalgona. Adding baking soda to fully hot caramel pushes browning further, creating deep brown toffee instead of the pale, whipped texture you want.
Work quickly once you add baking soda. Stir briefly to avoid over-thickening or scorching.
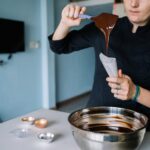
Step 4: Add the Pinch of Baking Soda and Stir Fast

One pinch is all you need—about 1/8 teaspoon per tablespoon of melted sugar—to transform your candy into that signature light, foamy dalgona. This precise amount of baking soda triggers the chemical reaction that creates the airy texture you’re after.
Add your baking soda to the hot sugar mixture, then perform a rapid stir for roughly 5 seconds. This quick action ensures even distribution throughout the melted sugar. You’ll witness an immediate transformation as the foamy texture develops right before your eyes.
The mixture expands dramatically, puffing up at least 4x in volume. Remove the pan from heat immediately after stirring. Prolonged exposure to heat darkens the candy and compromises its delicate structure. Work swiftly now—the candy hardens quickly once baking soda activates, so shape it promptly before it sets completely.
Step 5: Watch the Mixture Puff Up 4x in Volume

You’ll witness an immediate and dramatic transformation as the baking soda reacts with the hot sugar, causing the mixture to expand to roughly four times its original volume. This puffing happens because the baking soda releases carbon dioxide gas when it meets the melted sugar’s heat, creating tiny bubbles throughout the mixture and forming that characteristic honeycomb structure. You’re fundamentally watching a chemical reaction create the foundation for dalgona’s signature crispy, delicate texture that’ll develop once the candy cools.
The Puffing Process Explained
What happens when baking soda hits your hot sugar mixture? A chemical reaction occurs instantly, transforming your candy into something entirely different. The baking soda releases gas bubbles throughout the mixture, causing it to expand rapidly to four times its original volume. This dramatic puffing happens within seconds, so your timing must be precise. Remove heat immediately after adding the ⅛ teaspoon, then stir for about five seconds to distribute those gas bubbles evenly. Quick action prevents overflow and ensures consistent texture. If you delay the baking soda addition or use too much, the puffing becomes less dramatic and browning may occur. The window for success is narrow but manageable when you stay focused and work with intention.
Baking Soda Reaction Mechanics
Now that you’ve added your ⅛ teaspoon of baking soda to the hot sugar mixture, the real transformation begins. You’re witnessing a chemical baking soda reaction that’ll fascinate you. The heated sugar activates the baking soda, which immediately releases carbon dioxide gas throughout your mixture. This gas creates countless tiny bubbles, causing the entire mass to expand dramatically—at least fourfold in volume. That’s what gives dalgona candy its signature light, aerated texture. Stir quickly for about five seconds to maximize foaming before the mixture sets. The faster you work, the more gas you’ll trap within the structure. Remove your pan from heat promptly to prevent over-browning. This precise timing ensures your foaming process locks in that perfect, delicate crumb structure that makes dalgona candy so satisfying.
Step 6: Pour Onto Parchment and Wait 10 Seconds

Once your mixture reaches that perfect foamy consistency, it’s time to transfer it to your prepared surface. Pour the baking soda-infused candy onto your parchment as one circular blob. This single pour creates an even foundation for shaping.
Now comes the critical pressing time: wait exactly 10 seconds before touching it. This brief pause lets your candy set slightly, reducing sticking when you apply pressure with your tools.
| Timing Factor | Effect | Outcome |
|---|---|---|
| Too immediate pressing | Mixture spreads excessively | Thin, uneven disk |
| 10-second wait | Slight surface firmness develops | Clean, uniform thickness |
| Extended delay | Candy hardens too much | Difficult shaping |
During these 10 seconds, ready your pressing tools—a flat disc, dalgona press, or cookie cutters. Have them within arm’s reach. The warm candy won’t stick as much once it’s slightly set, enabling you to create crisp, defined patterns on your finished candy.
Step 7: Press Flat With Even Pressure, Then Pattern

Your warm candy’s now ready for shaping. Use a flat-bottomed tool or dalgona press to apply light, consistent pressure across the surface for about 10 seconds. This pressing creates a smooth, level disc that’s perfect for patterning.
Lift your tool straight up to reveal an even surface. If you’re adding a design with a cookie cutter, press it straight down onto the candy, then lift straight up. Avoid dragging or twisting, which distorts the shape and ruins your pattern.
Timing matters here. Your dalgona should be warm enough to stay pliable but set enough to hold impressions. This sweet spot typically occurs just seconds after pouring.
Allow your patterned candy to cool completely on the parchment before handling. This prevents smudging and warping, ensuring your design stays crisp and defined.
Common Mistakes: Too Much Baking Soda Creates Pancake Texture

While you’ve nailed the pressing and patterning technique, there’s a critical mistake that can undo all that careful work: using too much baking soda. When you add excess baking soda, you trigger aggressive aeration that transforms your candy into something resembling a pancake instead of a crisp, glass-like treat. The excessive leavening causes the mixture to puff up and become foamy, compromising the texture you’re after.
The key is restraint. Use just a pinch per tablespoon of melted sugar, then stir quickly for about five seconds. This timing maximizes aeration without over-expanding the mix. If your candy browns too dark or becomes unexpectedly airy, you’ve likely used too much baking soda. These signs tell you to adjust your measurements next time for better results.