Yes, you can bake cookies in a toaster oven. The key is adjusting your temperature down to 340–350°F and reducing bake time to 6–10 minutes since toaster ovens heat more intensely. Use the middle rack with parchment paper, space cookies 1½–2 inches apart, and monitor them closely for golden edges. Chill your dough beforehand to prevent excessive spreading. With these simple adjustments, you’ll get excellent results that match conventional oven baking.
Bake Cookies in Your Toaster Oven: What You Need to Know
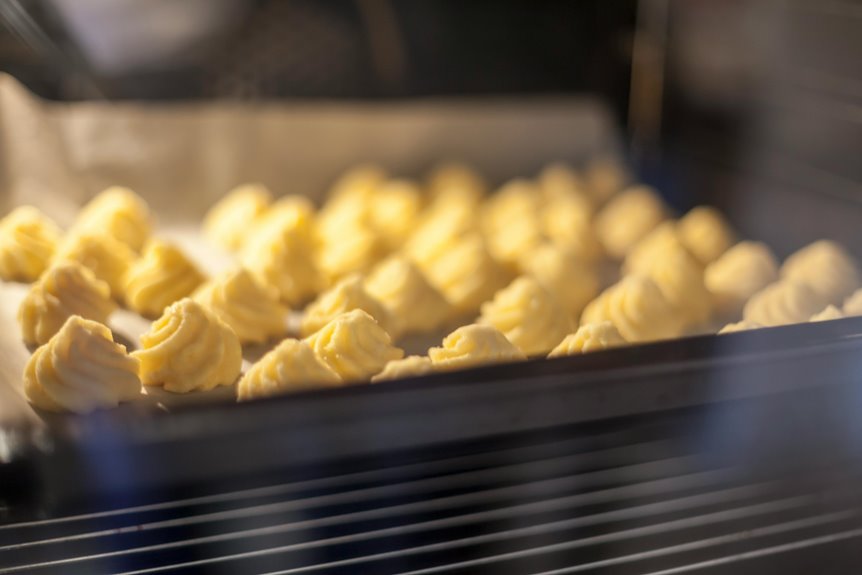
Why settle for waiting hours for a conventional oven when you can bake cookies in a toaster oven? You’ll join countless home bakers who’ve discovered this faster, more efficient method. Start by preheating your toaster oven to around 340°F—slightly lower than conventional ovens. Place your lined sheet pan with parchment paper on the middle rack, spacing cookies 1½–2 inches apart for even heat distribution. Chill your dough for at least 30 minutes beforehand to achieve that chewy texture you’re after. Your bake time typically ranges from 6–10 minutes, so monitor closely for golden edges and puffed centers. If your model has a convection setting, reduce the temperature by 25°F and use it for even browning. Once done, let cookies rest on the pan for 5–10 minutes before transferring to a cooling rack.
How Toaster Ovens Differ From Conventional and Convection Ovens?
What makes a toaster oven bake cookies differently than your full-size kitchen oven? Toaster ovens use direct heating elements from top and bottom, creating intense, localized heat that cooks faster than conventional ovens. You’ll notice shorter bake times because your cookies sit closer to these heating elements.
Convection models add a fan that circulates hot air, promoting evenness of bake without rotating pans. However, this intensity requires adjustments. Temperature adjustment is essential—reduce settings by about 25°F compared to conventional recipes. Rack placement and pan size matter greatly in these compact spaces. Use the middle rack and smaller baking sheets or silicone mats for consistent results.
Understanding these toaster oven baking differences helps you master cookie success in your compact appliance.
Essential Equipment for Toaster Oven Baking

Now that you’ve adjusted your expectations for temperature and timing, you’ll need the right gear to make your toaster oven baking work smoothly. You’ll rely on several key items to bake cookies successfully:
- Bakeware and mats: Small baking sheets or silicone mats fit properly inside your toaster oven, while parchment paper prevents sticking without extra cleanup
- Temperature verification: An oven thermometer compensates for inaccuracies in your toaster oven’s display, ensuring cookies bake at the correct heat
- Safety and positioning: Oven mitts protect your hands, and the middle rack typically delivers even baking results
Silicone mats must fit carefully to avoid touching heating elements, which creates fire hazards. Parchment paper offers a simpler alternative for most bakers. These essentials transform your toaster oven into a reliable cookie-baking machine, giving you confidence that each batch turns out consistently.
Adjust Temperature and Timing for Your Toaster Oven

You’ll need to adjust both temperature and timing since toaster ovens heat differently than standard ovens—typically running hotter with more direct heat from the elements. Start by reducing the recipe’s recommended temperature by about 25°F, then begin checking your cookies 2–4 minutes earlier than the conventional oven time to catch them at the right doneness. Testing a small batch first in your specific model lets you dial in the exact settings, since toaster ovens vary widely in how they distribute heat.
Temperature Settings By Oven Type
How do toaster ovens differ from standard ovens regarding temperature? You’ll need to adjust your approach because toaster ovens run differently than full-sized ones.
Here’s how to tweak temperature settings by oven type:
- Conventional toaster ovens: Lower the temperature by 25°F since heating elements sit closer to your food, creating hot spots that bake faster
- Convection toaster ovens: Reduce temperature another 25°F and monitor bake times closely, as circulating hot air accelerates cooking significantly
- Your specific model: Use an oven thermometer to verify actual temperatures, since dials often misrepresent real heat levels
Position your small batch cookies on the middle rack for even heating. Since toaster ovens have smaller cavities, bake times shrink considerably. Start checking your cookies 2–4 minutes earlier than standard oven guidelines, then adjust next time based on results.
Monitoring Baking Time Closely
The real challenge with toaster oven baking isn’t the temperature adjustment—it’s staying vigilant about timing. You’ll need to monitor closely because heat reaches your toaster oven cookies faster than in conventional ovens. Start checking around the 60–70% mark of your usual bake window rather than waiting until the end.
| Monitoring Strategy | When to Check | Expected Result |
|---|---|---|
| Standard baking | 60–70% of bake time | Catch doneness early |
| Convection setting | Earlier in window | Even browning |
| Test batch approach | First attempt | Calibrate your model |
| Rack position lower | Middle-to-lower spot | Prevent over-browning |
| Temperature reduction | 25°F less | Optimize results |
Run a test batch first to calibrate timing for your specific model. Different toaster ovens vary in heat accuracy and airflow. Remove sheets 1–2 minutes earlier than standard recipes suggest. With convection settings enabled, anticipate even faster results and adjust accordingly.
Testing Before Full Batches
Before committing to a full batch, bake a small test round to understand how your specific toaster oven behaves. Every model heats differently, so you’ll want to gather real data before investing time and ingredients.
Start with these adjustments:
- Lower your temperature by about 25°F from the recipe and reduce bake time accordingly
- Preheat fully, then monitor closely since direct heat exposure speeds up baking
- Position your sheet on the middle rack to promote even heating
Record everything: the temperature you used, actual bake time, rack position, and how the cookies turned out. Note any hot spots or uneven browning you observe. This information becomes invaluable for refining your next batches on that specific unit, transforming your toaster oven into a reliable baking tool.
Step-by-Step Chocolate Chip Cookie Process

You’ll start by creaming butter and sugars together until light and fluffy, which incorporates air and creates the right texture for your cookies. Next, you’ll mix your dry ingredients—flour, baking soda, and salt—in a separate bowl to distribute the leavening agent evenly throughout the dough. Finally, you’ll bake your scooped dough in the preheated toaster oven, then let the cookies cool on the pan before transferring them to a rack, which allows them to set properly and develop their final texture.
Creaming Butter And Sugars
Why does creaming matter so much? It’s the foundation for tender, evenly-textured toaster oven cookies. When you cream room-temperature butter with sugars, you’re building a butter and sugar emulsion that traps air throughout the mixture. This aeration directly affects your final cookie texture.
Here’s what proper creaming accomplishes:
- Creates a light, fluffy base that helps small batch cookies spread less and stay tender
- Forms a uniform emulsion allowing eggs and vanilla to blend smoothly for an even crumb
- Establishes the structure needed for consistent baking cookies results
Beat your softened butter and sugars until the mixture turns pale and smooth. Under-creaming produces dense cookies, while over-creaming creates excessive air that makes them thin. For toaster oven cookies, achieving this balance ensures you’ll get perfectly textured results every time you bake.
Mixing Dry Ingredients Together
Now comes an essential step that prevents overmixing and keeps your cookies tender. You’ll sprinkle flour, baking soda, baking powder, and salt over your egg mixture. Stir until the dough just comes together with only small flour streaks remaining. This careful approach prevents overworking the gluten, which would make your cookies tough instead of chewy.
Once your dry ingredients are fully incorporated, you’ll add your mix-ins. Nuts, sprinkles, or dried fruits go in at this stage, folding them gently into the cookie dough. After mixing, you’ll chill the dough for at least 30 minutes. This chilling period relaxes gluten development and improves both flavor and texture.
When you’re ready to bake in your toaster oven, this properly chilled dough prevents excessive spreading, giving you perfectly shaped cookies every time.
Baking And Cooling Cookies
Three key steps—preheating, spacing, and timing—make the difference between cookies that spread into one another and those that bake evenly in your toaster oven.
Start by preheating to 340–350°F (325°F convection). Place your baking sheet on the middle rack for consistent heat distribution. Space each cookie 1.5–2 inches apart on an ungreased sheet or silicone mat.
Bake your toaster oven cookies for 6–10 minutes. Watch for lightly browned edges while middles stay puffed. This balance creates that chewy texture you want.
Cooling matters as much as baking:
- Leave cookies on the pan for 5–10 minutes
- Transfer to a cooling rack to firm completely
- Allow extra time if using flax egg binder
Your cookie dough’s chilling and careful bake time combine to deliver perfectly textured results every time.
Why Cookies Spread or Burn (and How to Fix It)?

Ever wonder why your toaster oven cookies turn out differently than you expected? Spreading and burning happen because toaster ovens concentrate heat differently than full-sized ovens. Your cookie dough spreads excessively when it’s too warm or when you place it on a preheated sheet. Burnt edges result from intense direct heat near the heating elements, especially with dark cookie sheets at high temperatures.
Fix these issues by chilling your cooling dough before baking, reducing your baking temperature by about 25°F, and using the middle rack. Leave adequate cookie sheet spacing—roughly 1.5 to 2 inches between cookies—to prevent crowding. If you’re using convection, monitor your bake time closely since it accelerates baking. Ensure even dough portions and avoid overly hot surfaces for consistent, perfectly baked results.
5 Cookie Recipes That Work Great in a Toaster Oven

Which cookie recipes actually perform well in a toaster oven? You’ll find success with several reliable options that adapt perfectly to your appliance’s unique heat patterns.
Classic chocolate chip cookies work wonderfully when you:
- Use 1.5 tablespoon dough portions on ungreased cookie sheets or silicone mats
- Center your pan and space cookies 1.5–2 inches apart for even baking
- Bake at 340°F (325°F convection) for golden edges without burning
Almond flour-based jumbo cookies offer an egg-free alternative, baking at 340°F for approximately 14 minutes. For small-batch variations, you can experiment with flax-egg substitutes and adjust your brown sugar-to-white sugar ratios to control chewiness. These recipes acknowledge toaster oven limitations while delivering consistent results. The key is respecting bake time and temperature settings your toaster oven demands.
Store and Reheat Your Toaster Oven Cookies

How you store your toaster oven cookies makes the difference between soft, delicious treats and hard, stale ones. Cool baked cookies completely on a cooling rack before storing. This prevents condensation that causes sogginess. Keep toaster oven cookies in a covered container on your counter for up to two days to maintain soft centers.
For longer storage, freeze your toaster oven cookies for up to one month. When you’re ready to enjoy them, thaw frozen cookies for fifteen to twenty minutes first. Then reheat at 300°F in your toaster oven for two to four minutes. This restores warmth and melty chocolate texture. Day-old cookies need just fifteen to twenty seconds in the microwave or a quick toaster oven refresh. These simple steps keep your baked cookies tasting fresh and delicious.
Egg-Free and Ingredient Substitutions

Making cookies without eggs is entirely possible in your toaster oven, and you don’t need special equipment or hard-to-find ingredients to succeed. Almond flour becomes your secret weapon for egg-free cookies. It provides both moisture and oil, which means your toaster oven cookies achieve that desirable texture without traditional binders.
Egg-free cookies are entirely possible in your toaster oven with almond flour as your secret weapon for perfect texture.
Consider these no-egg substitutions:
- Flax egg: Mix 1 teaspoon flax meal with 1 tablespoon water, then wait 5 minutes for thickening before adding to your dough
- Almond flour: Replace all-purpose flour partially to maintain dough moisture and prevent excessive spreading, especially with chocolate chips
- Bread flour: Use equal amounts as a substitute to influence thickness and chewiness
Adjust your bake time accordingly. Egg-free dough may require slightly longer to set properly in your toaster oven, typically needing an extra 1-2 minutes for texture with substitutions to fully develop.