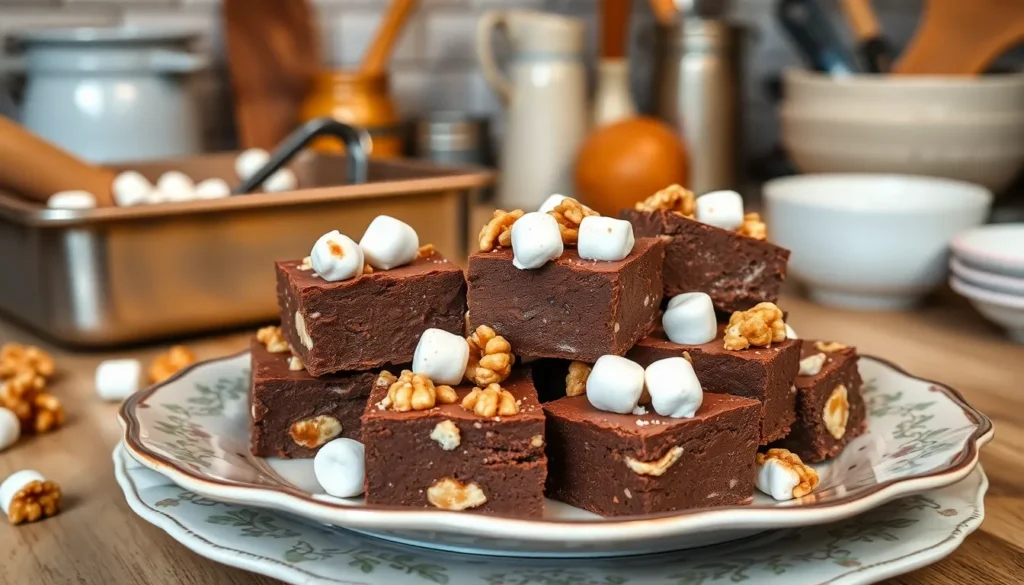
Rocky road fudge transforms the beloved ice cream flavor into an irresistible confection that’s impossible to resist. We’ve perfected this decadent treat that combines rich chocolate fudge with fluffy marshmallows and crunchy nuts – creating the ultimate dessert experience in every bite.
This crowd-pleasing candy originated from the classic rocky road ice cream but delivers even more intense flavors and satisfying textures. The combination of smooth chocolate base studded with chewy marshmallows and toasted nuts creates a symphony of contrasts that’ll have everyone asking for the recipe.
What makes our version special is how simple it is to create this bakery-quality fudge at home. You don’t need any special equipment or candy-making expertise – just a few quality ingredients and about 20 minutes of active time. The result is professional-looking squares of pure indulgence that make perfect gifts or party treats.
Ingredients
Creating perfect rocky road fudge starts with selecting the right ingredients. We’ve organized our ingredient list into two simple categories to make preparation effortless.

Original Recipe for Over 40 Years

ROCKY ROAD – One rocky road you’ll want to travel down again & again! We take our creamy, Chocolate Fudge and fill it with fluffy mini marshmallows and crunchy walnuts to deliver the perfect package.

Generous 1 pound package of Rocky Road fudge for sharing, gifting, or keeping on hand for sweet cravings
For the Fudge Base
- 3 cups semi-sweet chocolate chips
- 1 can (14 ounces) sweetened condensed milk
- 4 tablespoons unsalted butter
- 1 teaspoon vanilla extract
- 1/4 teaspoon salt
For the Rocky Road Mix-ins
- 2 cups mini marshmallows
- 1 1/2 cups chopped walnuts or pecans
- 1/2 cup mini chocolate chips
- 1/4 cup chopped almonds (optional)
Equipment and Tools Needed

Making rocky road fudge requires minimal special equipment, which makes this delicious treat accessible for home bakers at any skill level. We’ll walk you through the essential tools and helpful extras that will ensure your fudge turns out perfectly every time.

Melting cups, you not only can use the as a melt warmer to heat chocolate, candy, butter but also could use as a microwavable melting bowls container to store butter, oil. A must bakeware set for your kitchen.

Material: Made of high quality silicone.

Material: Made of high quality silicone.Temperature Resistance: -40C to 230C.
Essential Equipment
Baking Pan: We recommend using either a 9×9-inch or 9×13-inch baking pan for optimal results. The smaller pan creates thicker fudge squares while the larger pan produces thinner pieces. Line your chosen pan with parchment paper and lightly spray with non-stick cooking spray to prevent sticking.
Large Mixing Bowl: A spacious bowl is necessary for combining the chocolate base with our rocky road mix-ins. Choose one with enough room to fold in marshmallows and nuts without spillage.
Microwave-Safe Bowl: For our microwave method, select a bowl that can safely handle high heat while melting chocolate and sweetened condensed milk together.
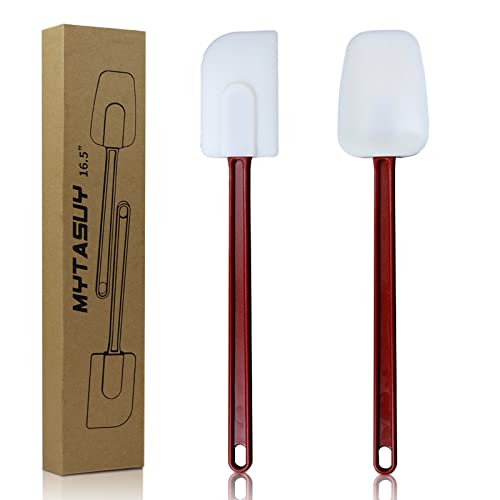
Rubber Spatula: This tool helps us stir the mixture smoothly and scrape down bowl sides for even incorporation of ingredients.
Cooling and Storage Tools
Refrigerator or Freezer Space: We need adequate chilling space to set our fudge properly. The refrigerator works well for standard setting while the freezer speeds up the process.
Sharp Knife: Once our fudge has set completely, a clean sharp knife ensures neat squares with clean edges.
Optional but Helpful Tools
| Tool | Purpose | Benefit |
|---|---|---|
| Kitchen Scale | Precise measurements | Ensures consistent results |
| Ultrasonic Cutter | Professional cuts | Creates uniform squares (not necessary for home use) |
The beauty of rocky road fudge lies in its simplicity. We don’t need candy thermometers or stovetop cooking equipment, making this recipe perfect for beginners who want impressive results with minimal fuss.
Instructions

Now that we have our ingredients ready and equipment prepared, let’s walk through the simple process of creating this irresistible rocky road fudge. Follow these step-by-step instructions to achieve perfectly textured squares every time.

SIMPLIFY BAKING: Our 9x13 inch Pre-Formed Parchment Paper ensures mess-free, non-stick baking, making cleanup a breeze!

[100% HEALTHY & UNBLEACHED]: Made from 100% natural wood pulp, Tikxlafe parchment paper is completely unbleached, non-toxic, and BPA-free. These natural brown sheets ensure your family’s food stays safe and healthy, without any harmful chemicals leaching into your meals.
![[220 Liners] Heavy Duty 9 Inch Parchment Rounds Paper Baking Sheets | Precut Silicone Coated & Unbleached – Will Not Curl or Burn – Non-Toxic & Comes in Convenient Packaging](https://m.media-amazon.com/images/I/51Hdn81YeoL._SL500_.jpg)
SAVE YOURSELF THE HASSLE – Are you tired of wasting time cutting a perfectly sized liner for your round cake pans? Well, your struggles are finally over. Baker’s Signature precut, and unbleached baking sheets are just right for your 9-inch pans. Our parchment paper rounds are extra durable and come with convenient lift tabs making removing finished goods an effortless breeze. Our sheets do not curl, stick or burn leaving you with just one thing to do – let your delicious recipes come to life!
Prep the Pan and Ingredients
We start by preparing our 9×9-inch baking pan with nonstick cooking spray to ensure easy removal later. Line the greased pan with parchment paper, leaving some overhang for simple lifting once the fudge sets.
Gather all our ingredients and have them measured and ready to use. Chop the walnuts or pecans into bite-sized pieces if not already done. Reserve about 1/2 cup of mini marshmallows for topping, keeping the rest ready for mixing into our fudge base.
Make the Fudge Base
Place the sweetened condensed milk and semi-sweet chocolate chips in our microwave-safe bowl. Heat the mixture in 30-second intervals, stirring thoroughly between each heating session to prevent burning.
Continue this process until the chocolate melts completely and the mixture becomes smooth and glossy. Stir in the unsalted butter until it melts and incorporates fully. Add the vanilla extract and salt, mixing until our fudge base reaches a uniform consistency.
Add the Mix-ins
Working quickly while the fudge base remains warm, fold in the chopped nuts using our rubber spatula. The nuts should distribute evenly throughout the mixture without breaking apart.
Gently stir in most of the mini marshmallows, reserving our set-aside portion for the top. Add the mini chocolate chips last, folding them in carefully to maintain their shape and prevent melting.
Set and Chill
Pour our rocky road fudge mixture into the prepared pan, spreading it evenly with the rubber spatula. Press the surface gently to ensure uniform thickness across the entire pan.
Sprinkle the reserved mini marshmallows over the top, pressing them lightly into the surface so they adhere properly. Transfer the pan to the refrigerator and chill for 2-3 hours until the fudge becomes completely firm to the touch.
Directions for Perfect Results

We’ve perfected our rocky road fudge technique through countless batches and want to share the crucial steps that guarantee success every time. These professional tips will help you avoid common pitfalls and create fudge with the ideal texture and flavor.
![Quarter Sheet Pan with Cooling Rack Set [2 Baking Sheets + 2 Baking Racks], CEKEE Stainless Steel Cookie Sheets for Baking and Wire Rack - Rust & Warp Resistant & Nonstick, Size 12 x 9.8 x 1 Inch](https://m.media-amazon.com/images/I/51bCW7VK2dL._SL500_.jpg)
PERFECT AND COMPLETE SET: CEKEE quarter baking sheet with rack sets are 4 PIECES , which includes 2 baking pans: 12.59 × 9.84×1.18 Inch, 2 Wire Racks: 11.57×8.97 Inch. This quarter sheet pan with cooling rack is perfect combo, which can help you for baking or cooking favorite food

Designed for passionate home bakers, this cooling grid offers reliable performance, even cooling distribution, and a non-stick coating for consistent, professional-level results for decorating.

HEAVY DUTY, NO-WARP CONSTRUCTION: Built from durable heavy-gauge steel that holds its shape under high oven heat - no warping or popping mid-bake; engineered for consistent, even heat distribution across the entire pan surface for reliable baking results every time.
Temperature Tips
We always keep our heat at medium or lower when melting chocolate to prevent scorching. Chocolate burns easily and becomes grainy when exposed to high temperatures. Using a microwave works best at 50% power with 30-second intervals.
Our sweetened condensed milk should be at room temperature before combining with chocolate chips. Cold condensed milk can cause the chocolate to seize up and become lumpy. We let it sit on the counter for about 30 minutes before starting.
Refrigeration temperature stays consistent at 35-40°F for proper setting. We avoid placing the fudge near the freezer vents where temperature fluctuations occur. The fudge needs steady cold temperatures to develop its signature firm yet creamy texture.
Mixing Techniques
We stir constantly while melting our chocolate mixture to prevent sticking and ensure even heating. Circular motions work better than back-and-forth stirring. The mixture should be completely smooth before adding any mix-ins.
Gentle folding becomes essential when incorporating marshmallows and nuts. We use a rubber spatula and fold from bottom to top to avoid crushing the delicate marshmallows. Overmixing can break down the marshmallows and create a sticky mess.
Our nuts get added first since they hold their shape better during mixing. We reserve about half the marshmallows for the final topping to ensure every bite has visible rocky road elements.
Setting Time Guidelines
We refrigerate our rocky road fudge for 2 to 3 hours minimum until completely firm. The surface should feel solid to the touch and not leave fingerprints when pressed gently.
Cutting happens only after the fudge reaches full firmness. We use a sharp knife warmed under hot water and wiped clean between cuts for neat squares. Room temperature fudge becomes too soft and creates messy uneven pieces.
Storage requires keeping the fudge refrigerated until serving time. We maintain freshness by covering tightly with plastic wrap or storing in an airtight container for up to one week.
Storage Instructions

Proper storage ensures our rocky road fudge maintains its delicious texture and flavor for weeks or even months. We recommend using airtight containers to protect the fudge from moisture and air exposure that can affect its quality.

FOOD GRADE SILICONE SPATULA: This silicone spatula set is suitable for cooking, baking, and mixing. Flip eggs or pancakes, make cakes, scrape butter, etc.

VERSATILE KITCHEN UTENSILS – With long handle and small/mini head, this silicone rubber spatula is a perfect scraper for jar/blender/bottle those deep containers to scrape peanut butter, mayonnaise and more, also can be used for mixing, stirring, frostings and cooking with nonstick cookware.
【Quality Material】 These silicone spatulas are made of 100% food-grade silicone blade and nylon handle, can withstand temperatures up to 500 degrees Fahrenheit. This spatula does not stain or fade or discolor, is odorless, durable, and will not crack when used in high temperatures. Meets NSF standards, 100% food safe
Room Temperature Storage
We can keep our rocky road fudge at room temperature for optimal convenience and texture. Store the cut squares in an airtight container for up to 1 week to maintain freshness. Place parchment or wax paper between layers to prevent the pieces from sticking together. Keep the container away from heat sources and direct sunlight to preserve the fudge’s shape and prevent melting.
| Storage Method | Duration | Container Type | Special Notes |
|---|---|---|---|
| Room Temperature | 1 week | Airtight container | Use parchment between layers |
Refrigerated Storage
Our fudge stores beautifully in the refrigerator for extended freshness. Place the squares in an airtight container and refrigerate for up to 3 weeks. The cold temperature firms up the texture while preserving all the flavors. We can enjoy the fudge straight from the refrigerator for a firmer bite or let it soften at room temperature for about 10 minutes before serving.
Freezer Storage
Freezing offers the longest storage option for our rocky road fudge. Wrap individual squares or larger portions tightly in plastic wrap before placing them in freezer-safe containers or bags. Our fudge maintains its quality in the freezer for up to 3 months. When we’re ready to enjoy it, thaw the fudge overnight in the refrigerator before bringing it to room temperature for the best texture and flavor experience.
Serving Suggestions

We recommend cutting our rocky road fudge into perfectly sized squares for the most appealing presentation. The ideal serving size measures about 1-inch squares, which provides just the right balance of sweetness without overwhelming your guests.
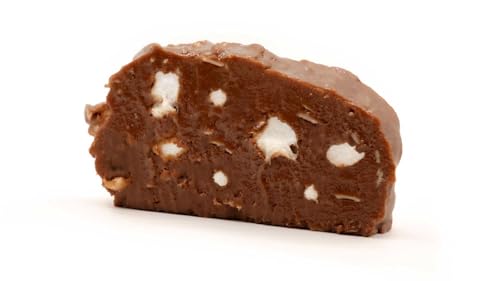
ROCKY ROAD - Get ready to embark on a Rocky Road journey you’ll want to take time and time again! We start with a rich chocolate base and fold in crunchy almonds for that perfect crunch. Next, we mix in fluffy mini-marshmallows, and voilà—pure bliss in every bite! This delightful treat will lead you down a sweet path where you’ll love every delightful bump along the way!
ROCKY ROAD – One rocky road you’ll want to travel down again & again! We take our creamy, Chocolate Fudge and fill it with fluffy mini marshmallows and crunchy walnuts to deliver the perfect package.

Cutting and Presentation
When we’re ready to serve, we use a sharp knife warmed under hot water and dried thoroughly between cuts. This technique ensures clean edges and prevents the marshmallows from sticking to the blade. For special occasions, we arrange the squares on a decorative platter lined with parchment paper or small paper cups for easy handling.
Temperature Preferences
Our rocky road fudge tastes exceptional when served chilled directly from the refrigerator. The cool temperature enhances the chocolate flavor while maintaining the perfect firm texture. We’ve found that allowing the fudge to sit at room temperature for 10-15 minutes before serving creates a slightly softer bite that many people prefer.
Portion Control and Occasions
| Serving Size | Occasion | Recommended Amount |
|---|---|---|
| 1-inch squares | Individual treats | 1-2 pieces per person |
| 2-inch squares | Dessert course | 1 piece per person |
| Mini bites | Party platters | 3-4 pieces per person |
Creative Serving Ideas
We love pairing our rocky road fudge with vanilla ice cream for an indulgent dessert experience. The contrast between the cold ice cream and rich fudge creates a delightful temperature and texture combination. For coffee lovers, we serve small squares alongside espresso or strong coffee to complement the chocolate intensity.
Storage for Serving
Our fudge maintains its best serving quality when stored in airtight containers with parchment paper between layers. We keep individual portions wrapped in small cellophane bags for grab-and-go treats or gift giving. This method preserves freshness while making the fudge easy to serve at parties or family gatherings.
Variations and Substitutions

Rocky road fudge offers endless possibilities for customization to suit different dietary needs and taste preferences. We can easily adapt our base recipe with simple substitutions and creative mix-ins to create unique flavor combinations.

MELT BUTTER IN SECONDS — 150ML BUTTER WARMER, SET OF 3 - Each Palksky butter warmer holds 150ml / 5.1 fl oz — the right size for melting a portion of butter without waste. Add butter, microwave in short intervals, then squeeze and pour directly through the spout. Perfect for drizzling over popcorn, lobster, crab, shrimp and other seafood. The set of 3 butter warmer pots means you can keep one at the table, one in use and one ready to go.

1 - 30 oz By The Cup Microwave Bowl with handle, locking-clip lid and steam release vent; BPA-free

❀PREMIUM SILICONE: Webake melting pot is made of 100% good-grade silicone, and featuring a removable lid and pouring lip, nonstick, BPA Free Pinch Test passes.
Nut-Free Options
For those with nut allergies or preferences, we have several excellent alternatives that maintain the signature crunch of traditional rocky road fudge. Sunflower seeds provide a nutty flavor without the allergy concerns and offer similar texture to chopped nuts. Pretzels deliver a delightful salty contrast and satisfying crunch that complements the sweet chocolate base perfectly.
We can also substitute with toasted pumpkin seeds for an autumn twist or use crispy rice cereal for extra crunch. These alternatives ensure everyone can enjoy our rocky road fudge without compromising on texture or flavor.
Different Chocolate Types
The chocolate base dramatically influences the final flavor profile of our fudge. Milk chocolate creates a sweeter and creamier result that appeals to those who prefer milder chocolate flavors. Dark chocolate produces a richer, more intense fudge with sophisticated bitter notes that balance beautifully with sweet marshmallows.
White chocolate offers a completely different experience with its sweet, vanilla-forward flavor that creates an elegant twist on the classic recipe. We can even combine multiple chocolate types within the same batch for a complex flavor profile that surprises with every bite.
Additional Mix-in Ideas
Beyond the traditional nuts and marshmallows, we can enhance our rocky road fudge with exciting mix-ins that add both visual appeal and flavor variety. M&M’s bring vibrant colors and extra sweetness while maintaining their crunch even after refrigeration. Toffee bits contribute a sophisticated caramel-like flavor that elevates the overall taste experience.
Peanut butter chips introduce a creamy, nutty element that pairs exceptionally well with chocolate, while butterscotch chips offer a sweet, creamy flavor reminiscent of classic candy shop treats. We can experiment with dried fruits like cranberries or cherries for tartness, or add coconut flakes for tropical notes. The key is balancing flavors and textures to create our perfect personalized version.
Troubleshooting Tips

Even experienced bakers encounter challenges when making rocky road fudge. We’ve compiled answers for the most common issues to help you achieve perfect results every time.
SUPERIOR QUALITY: Our parchment paper circles are designed with premium food grade silicone paper with quality in mind, Not Bleached, Non Toxic, Non-Wax, 100% Safe for daily use. HEAT RESISTANT up to 446 degree F (230 ℃) , perfect for dutch oven, toaster oven, tortilla press, cheesecake pan, springform pans, air fryer and so on

SAFE & HEALTHY MATERIALS: Our parchment sheets are made of 100% natural wood pulp, no fluorescents, completely non-toxic and meets food safety standards. White parchment paper is heat-resistant up to 450°F, perfect for any baking or cooking need

DIMENSIONS: Pre-cut sheets measuring 6 inches by 9 inches, perfect for standard baking pans and food preparation surfaces
Fudge Not Setting Properly
When your fudge remains soft after the recommended chilling time, several factors could be at play. We recommend first checking that your refrigerator maintains a consistent temperature below 40°F. If the fudge still won’t set after extended chilling, place it in the freezer overnight. Once frozen solid, you can coat the entire surface with melted chocolate for a professional finish that masks the texture issue.
Temperature accuracy during preparation plays a crucial role in setting success. Ensure your sweetened condensed milk and chocolate chips reach proper melting consistency without overheating the mixture.
Dealing with Grainy Texture
Overheating creates the most common cause of grainy fudge texture. We strongly advise using a thermometer to monitor temperature throughout the melting process. Keep heat settings low to medium and remove from heat source immediately once chocolate chips melt completely.
If graininess already developed, don’t discard your batch. Add one tablespoon of water to the mixture and reheat slowly over low heat while stirring constantly. This technique often restores smooth consistency.
Correcting Consistency Issues
| Problem | Solution | Prevention |
|---|---|---|
| Too soft | Extend refrigeration time to 4-6 hours | Measure ingredients precisely |
| Too hard | Add 1-2 tablespoons warm milk, reheat gently | Monitor heating temperature |
| Crumbly | Increase butter by 1 tablespoon | Use room temperature ingredients |
Rocky road fudge that turns out too soft requires extended chilling time in the refrigerator. We suggest waiting at least four to six hours before cutting. For overly hard fudge, gently reheat the mixture with a small amount of warm milk until it reaches the desired consistency.
Ingredient Integration Problems
Marshmallows that melt completely into the fudge indicate excessive heat during mixing. We always add marshmallows when the chocolate mixture cools slightly but remains workable. This timing preserves their shape while ensuring proper distribution.
Nuts that sink to the bottom suggest the fudge base was too warm during addition. Allow the mixture to cool for two to three minutes before folding in nuts and marshmallows for even distribution throughout each square.
Make-Ahead Instructions

Rocky road fudge stands out as one of our favorite make-ahead desserts because it actually improves in flavor and texture when given time to set properly. We can prepare this indulgent treat days or even weeks before serving without compromising quality.

SHEET PAN SET INCLUDES: 10-Inch x 15-Inch Cookie Pan, Nonstick Wire Cooling Rack

Non-Stick Brownie Pans: The flexible silicone and non-stick finish allow to easy and quick release of baked goods and desserts.

SET OF TWO COOLING RACKS: Hold up to two dozen cookies each and are ideal for cooling cookies, cakes, cupcakes, muffins, and other desserts
Preparing in Advance
We recommend making rocky road fudge at least 24 hours before your event to allow the flavors to meld completely. The marshmallows will soften slightly during this time while the nuts maintain their delightful crunch. Our testing shows that fudge prepared 2-3 days ahead develops the most balanced texture and richest chocolate flavor.
Timing Your Preparation
Start your fudge preparation 3-4 hours before you need refrigerator space for other items. We suggest completing the cooking and pouring process in the morning if you plan to serve the same evening. This schedule allows adequate setting time while keeping your kitchen workflow manageable.
Storage Timeline Options
| Storage Method | Duration | Best For |
|---|---|---|
| Room Temperature | 2-3 days | Quick consumption |
| Refrigerated | Up to 2 weeks | Extended freshness |
| Frozen | Up to 2 months | Long-term storage |
Pre-Cutting Strategy
We find it helpful to score the fudge lightly with a knife after 1 hour of chilling but before it completely sets. This technique creates cutting guidelines that make portioning much easier later. Wait until the fudge is completely firm before making the final cuts to ensure clean edges.
Advance Portioning
Consider cutting your rocky road fudge into serving pieces 1-2 days before your event. Store the cut pieces in airtight containers with parchment paper between layers to prevent sticking. We place individual pieces in mini cupcake liners for elegant presentation at parties or gift-giving occasions.
Transportation Tips
For events away from home we wrap the uncut fudge block in plastic wrap and transport it in a cooler with ice packs. Cut the fudge at your destination using a sharp knife warmed under hot water for the cleanest presentation. This method ensures your rocky road fudge arrives looking as perfect as when you made it.
Conclusion
We’ve shown you how to create delicious rocky road fudge that’s both impressive and surprisingly simple to make. With just a few quality ingredients and basic kitchen tools you can create this crowd-pleasing treat in about 20 minutes of active prep time.
The beauty of this recipe lies in its flexibility – you can customize the mix-ins to suit your taste preferences or dietary needs while maintaining that perfect balance of creamy chocolate smooth texture and delightful crunch.
Whether you’re preparing for a special occasion or simply want to treat yourself and loved ones this rocky road fudge delivers consistent results every time. The make-ahead friendly nature means you can have homemade confections ready whenever the craving strikes.

🥞Premium 100% Food Grade Silicone🍲 The silicone spatula set is made of healthy and friendly material, resistant to high temperatures up to 428 °F. No more melting, cracking and non-stick surface, whether cooking, baking, decorating or mixing use spatula, which are are safe, good for your health.
VERSATILE KITCHEN UTENSILS – With long handle and small/mini head, this silicone rubber spatula is a perfect scraper for jar/blender/bottle those deep containers to scrape peanut butter, mayonnaise and more, also can be used for mixing, stirring, frostings and cooking with nonstick cookware.

PACKAGE INCLUDES: 3 X Commerical Silicone Rubber Spatulas (9.5-Inch); With the head part made of premium food-grade silicone rubber, and the handle made of nylon plastic, this spatula set is nontoxic, BPA-free & very durable. Both the head blade and the handle are 100% safe for direct food contact. Perfect for cooking, stirring, batter and jam scraping.
Frequently Asked Questions
What ingredients do I need to make rocky road fudge?
You’ll need two main categories of ingredients: the fudge base (3 cups semi-sweet chocolate chips, 1 can sweetened condensed milk, 4 tablespoons butter, 1 teaspoon vanilla, and 1/4 teaspoon salt) and mix-ins (2 cups mini marshmallows, 1 1/2 cups chopped nuts, 1/2 cup mini chocolate chips, and optional almonds).
How long does it take to make rocky road fudge?
Rocky road fudge takes about 20 minutes of active preparation time. However, you’ll need to allow 2-3 hours for chilling in the refrigerator until the fudge becomes firm enough to cut into squares.
What equipment do I need to make this fudge?
You’ll need minimal equipment: a 9×9-inch or 9×13-inch baking pan, large mixing bowl, microwave-safe bowl, rubber spatula, and a sharp knife for cutting. Optional tools include a kitchen scale for precise measurements and parchment paper for easy removal.
Can I make substitutions for dietary restrictions?
Yes! For nut-free versions, substitute sunflower seeds, pretzels, or crispy rice cereal. You can use milk chocolate, dark chocolate, or white chocolate instead of semi-sweet. Add different mix-ins like M&M’s, toffee bits, dried fruits, or coconut flakes for variety.
How should I store rocky road fudge?
Store rocky road fudge in an airtight container in the refrigerator for up to one week or freeze for up to three months. For parties, wrap individual portions for easy serving. Keep chilled for the best texture and flavor.
What should I do if my fudge won’t set properly?
If your fudge remains soft after the recommended chilling time, extend refrigeration for several more hours or freeze overnight. Ensure your refrigerator maintains consistent temperature. If the texture is grainy, add a small amount of water and gently reheat to smooth it out.
Can I make rocky road fudge ahead of time?
Absolutely! Rocky road fudge actually improves in flavor and texture when made ahead. Prepare it at least 24 hours before serving for best results. It can be stored at room temperature for 2-3 days, refrigerated for a week, or frozen for months.
How do I cut the fudge into neat squares?
Use a sharp knife warmed under hot water and dried between cuts. Cut the fudge into 1-inch squares for optimal presentation. Make sure the fudge is fully chilled and firm before cutting to achieve clean, professional-looking edges.