

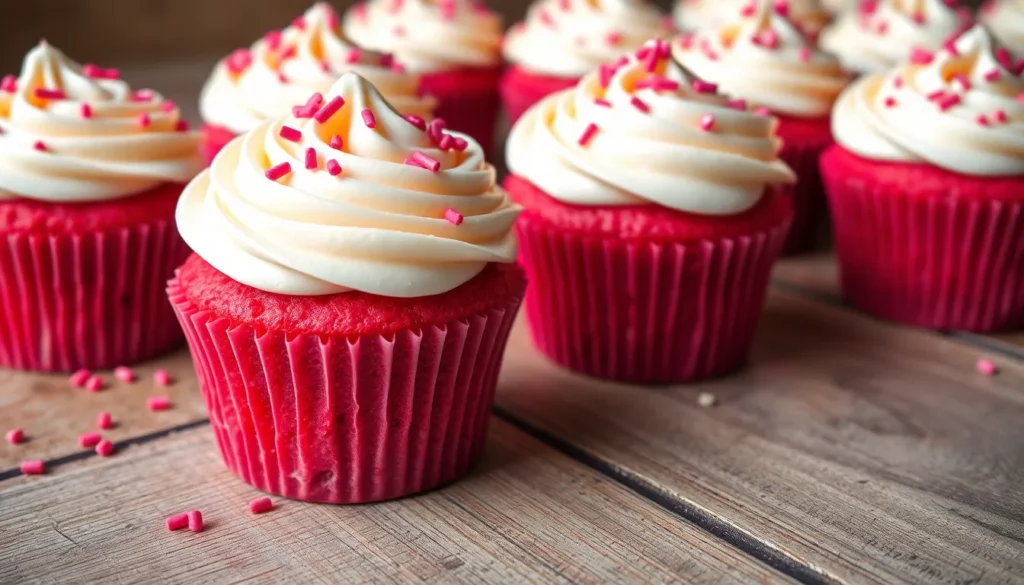
Pink velvet cupcakes bring all the beloved flavors of classic red velvet cake in a stunning rosy-hued package that’s perfect for any celebration. We’ve transformed the traditional recipe with natural pink coloring and a hint of vanilla that creates these gorgeous, Instagram-worthy treats your guests won’t be able to resist.
These fluffy, tender cupcakes deliver that signature velvet texture we all crave – moist, light, and incredibly flavorful. The subtle cocoa undertones paired with tangy buttermilk create the perfect balance that makes red velvet so irresistible, while the beautiful pink color adds a playful twist that’s ideal for baby showers, Valentine’s Day, or birthday parties.
What makes our pink velvet cupcakes truly special is how they maintain all the classic characteristics you love while offering something visually striking and deliciously different. Top them with cream cheese frosting and you’ve got a dessert that’s both nostalgic and fresh – guaranteed to become your new go-to recipe for special occasions.
Ingredients
Creating perfect pink velvet cupcakes requires quality ingredients that work together to achieve that signature tender crumb and vibrant color. We’ve organized our ingredient list by component to make your baking process smooth and efficient.
For the Pink Velvet Cupcakes
- 1¼ cups all-purpose flour
- 1 cup granulated sugar
- 1 tablespoon unsweetened cocoa powder
- 1 teaspoon baking soda
- ½ teaspoon salt
- ½ cup vegetable oil
- ¾ cup buttermilk, room temperature
- 1 large egg, room temperature
- 1 tablespoon white vinegar
- 1 teaspoon vanilla extract
- Pink gel food coloring (start with ½ teaspoon)
- ½ cup hot water
For the Cream Cheese Frosting
- 8 oz cream cheese, softened to room temperature
- ½ cup unsalted butter, softened
- 3½ cups powdered sugar, sifted
- 1 teaspoon vanilla extract
- Pinch of salt
- 2-3 tablespoons heavy cream (if needed for consistency)
For Decoration
- Pink sprinkles or sugar pearls
- Edible glitter (optional)
- Fresh raspberries or strawberries
- White chocolate shavings
- Additional pink gel food coloring for frosting tinting
Equipment Needed
 1")
Creating perfect pink velvet cupcakes requires exact tools that ensure consistent results and professional presentation. We’ve compiled a comprehensive list of essential equipment that will help you achieve bakery-quality cupcakes every time.
Essential Mixing Equipment:
- Large bowl for combining wet ingredients
- Medium bowls for preparing dry ingredients separately
- Small bowl for mixing baking soda and vinegar
- Electric mixer for achieving smooth batter consistency
- Whisk for combining dry ingredients evenly
Baking Essentials:
- Standard cupcake pan for proper shape and size
- Cupcake liners to prevent sticking and add visual appeal
- Measuring cups and spoons for accurate ingredient portions
- Baking sheet for easy oven transport
Testing and Cooling Tools:
- Toothpick for testing doneness
- Wire rack for proper cooling circulation
Frosting and Decoration Equipment:
- Piping bag for professional frosting application (optional but recommended)
- Various piping tips for different decorative effects
Having the right equipment streamlines the baking process and ensures our pink velvet cupcakes turn out beautifully every time. Quality tools make measuring accurate and mixing efficient while proper cooling equipment prevents soggy bottoms and maintains the cupcakes’ delicate texture. The optional piping bag elevates the final presentation and allows for creative frosting designs that complement the stunning pink color of these special treats.
Instructions
 2")
Creating these stunning pink velvet cupcakes involves several straightforward steps that ensure perfect results every time. We’ll guide you through each phase from preparation to final decoration.
Prep Work
We start by preheating our oven to 350°F (175°C) and lining our cupcake tins with paper or foil liners. In a medium bowl, we whisk together the flour, baking powder, and salt until well combined. Setting this dry mixture aside allows us to focus on creating the perfect batter.
Making the Pink Velvet Batter
We cream the butter and sugar in a large mixing bowl until the mixture becomes light and fluffy, which takes about 2-4 minutes with an electric mixer. Adding eggs one at a time ensures proper incorporation, and we mix well after each addition. Next, we incorporate the vanilla extract and sometimes add cinnamon for enhanced flavor depth.
The bright pink food coloring gets mixed in until the batter achieves an even, vibrant hue throughout. We alternate adding our dry ingredients and buttermilk to the creamed mixture, beginning and ending with the dry ingredients while mixing until just combined.
Finally, we combine the baking soda and vinegar in a separate small bowl until the mixture becomes fizzy, then gently fold this reaction into our batter for optimal texture.
Baking the Cupcakes
We divide the batter evenly among our prepared liners, filling each about 1/2 to 2/3 full since the cupcakes will rise during baking. Our cupcakes bake at 350°F for 12-20 minutes, depending on our exact oven and recipe variations.
Testing for doneness involves checking that the tops spring back when lightly touched or inserting a toothpick that comes out clean. We allow the cupcakes to cool completely before proceeding to frosting, as this prevents melting and ensures smooth application.
Preparing the Cream Cheese Frosting
We combine softened butter and cream cheese in our mixing bowl, beating until the mixture becomes smooth and creamy. Gradually adding powdered sugar and vanilla extract while beating creates the perfect fluffy consistency we desire.
Adding a small amount of pink food coloring creates a matching hue that complements our pink velvet cupcakes beautifully, though this step remains optional based on our aesthetic preferences.
Assembly and Decoration
We pipe our cream cheese frosting onto the cooled cupcakes using a piping bag fitted with a star tip for an attractive, professional finish. Sprinkling colored sprinkles, edible pearls, or other festive toppings adds visual appeal and creates the perfect celebratory presentation our guests will love.
Tips for Perfect Pink Velvet Cupcakes
 3")
Creating flawless pink velvet cupcakes requires attention to detail and proper technique. We’ve compiled essential tips to help you achieve bakery-quality results every time.
Use Room Temperature Ingredients
Bringing all ingredients to room temperature ensures better mixing and texture. Cold ingredients don’t combine properly and can create lumpy batter. We recommend taking eggs and buttermilk out of the refrigerator 30 minutes before baking. Butter should be soft enough to leave a fingerprint when pressed but not melted.
Avoid Overmixing the Batter
Overmixing develops too much gluten and creates dense cupcakes. Mix dry ingredients just until combined with wet ingredients. Stop mixing once you no longer see flour streaks. The batter should look slightly lumpy rather than perfectly smooth.
Don’t Overbake Your Cupcakes
Overbaking creates dry and crumbly cupcakes that lose their signature velvet texture. Start checking for doneness at 12 minutes using a toothpick inserted in the center. The toothpick should come out clean or with just a few moist crumbs. Remove cupcakes from the oven immediately once they pass the toothpick test.
Fill Cupcake Liners Properly
Filling liners between ½ to ⅔ full prevents overflow and ensures even baking. Use an ice cream scoop or large spoon to portion batter consistently. This technique helps all cupcakes bake at the same rate and creates uniform shapes.
Monitor Oven Temperature
Preheating to exactly 350°F (175°C) is crucial for proper rise and texture. Use an oven thermometer to verify accuracy since many ovens run hot or cold. Baking at the wrong temperature can result in sunken centers or tough cupcakes.
Add Baking Soda and Vinegar Mixture Last
The fizzy reaction between baking soda and vinegar creates the characteristic light texture. Mix these ingredients together just before adding to the batter. This reaction provides immediate lift and contributes to the fluffy crumb structure.
Test Doneness Frequently
Check cupcakes every 2-3 minutes after the 12-minute mark to prevent overbaking. Cupcakes are done when they spring back lightly when touched and pull slightly away from the liner edges. Different ovens may require 12-18 minutes of baking time.
Storage Instructions
 4")
We recommend storing your freshly baked pink velvet cupcakes properly to maintain their signature fluffy texture and delicious flavor. After your cupcakes have cooled completely on a wire rack, place them in an airtight container for optimal freshness.
For short-term storage, we suggest keeping the cupcakes covered at room temperature for up to 2 days. But, refrigeration provides the best results for maintaining quality and extending shelf life. Store your pink velvet cupcakes in the refrigerator for 3 to 5 days in a tightly covered container.
Before serving refrigerated cupcakes, we always remove them from the refrigerator and allow them to come to room temperature. This step ensures the best texture and flavor experience for your guests.
For longer storage periods, freezing works exceptionally well for pink velvet cupcakes. Place the cupcakes (whether frosted or unfrosted) in an airtight container or resealable freezer bag. Frozen cupcakes maintain their quality for up to 3 months in the freezer.
When you’re ready to enjoy frozen cupcakes, we recommend defrosting them at room temperature for 15 to 20 minutes. Unfrosted cupcakes freeze particularly well, giving you the option to add fresh cream cheese frosting after thawing for the best presentation.
| Storage Method | Duration | Container Requirements |
|---|---|---|
| Room Temperature | 2 days | Covered, airtight container |
| Refrigerator | 3-5 days | Covered, airtight container |
| Freezer | Up to 3 months | Airtight container or freezer bag |
No reheating is necessary for stored pink velvet cupcakes. We find they taste best when served cold directly from the refrigerator or at room temperature after proper thawing.
Make-Ahead Tips
 5")
Planning ahead makes pink velvet cupcake preparation stress-free and allows us to focus on enjoying our special occasion. We recommend baking these delicious treats in advance to ensure perfect results every time.
Preparing Cupcakes in Advance
Baking the cupcakes ahead of time offers tremendous flexibility for busy schedules. We can bake our pink velvet cupcakes up to two days before serving and store them unfrosted at room temperature in an airtight container. The cupcakes maintain their signature fluffy texture and vibrant color when properly stored.
For extended storage we place the cooled cupcakes in the refrigerator where they stay fresh for up to five days. This method works particularly well when we need to prepare large batches for parties or events.
Frosting Preparation Strategy
Cream cheese frosting benefits from advance preparation and actually improves in flavor when made ahead. We prepare our frosting up to three days before use and store it covered in the refrigerator. The frosting firms up during chilling which makes piping easier and creates more defined decorative swirls.
Before using refrigerated frosting we let it come to room temperature for about 30 minutes. A quick remix with our electric mixer restores the smooth creamy texture that makes our pink velvet cupcakes irresistible.
Assembly Timeline
We frost our cupcakes on the day of serving for optimal presentation and taste. Room temperature cupcakes accept frosting better than cold ones and create a more appealing contrast of textures. This approach prevents the frosting from becoming too firm or developing condensation that can affect appearance.
Decorated cupcakes stay beautiful for several hours at room temperature making them perfect for parties and gatherings. We add final touches like pink sprinkles or fresh berries just before serving to maintain their vibrant appearance and festive appeal.
Variations and Substitutions
 6")
We love how adaptable pink velvet cupcakes can be to suit different tastes and dietary needs! Our favorite variations center around frosting options that enhance these delicate treats. Cream cheese frosting remains our top choice because its tanginess perfectly balances the cupcakes’ sweetness while maintaining that classic velvet cake experience. When we want something sweeter and creamier, vanilla buttercream frosting delivers exceptional results with its rich texture and mild flavor profile.
Coloring Alternatives
Pink food coloring gives us the most vibrant and consistent results for achieving that signature pink hue. We typically use gel food coloring for intense color without thinning the batter. For those preferring natural alternatives, beet juice creates a lovely pink shade while adding subtle earthy undertones. This natural option works particularly well when we want to avoid artificial additives.
Cake Base Options
Our buttermilk cake base produces the moistest pink velvet cupcakes with that tender crumb we all crave. The buttermilk’s acidity activates the baking soda while creating the characteristic tangy flavor that defines velvet cakes. White cake mix serves as an excellent shortcut when time is limited. We enhance boxed mix by adding sour cream for extra moisture and richness that rivals homemade versions.
Essential Substitutions
| Original Ingredient | Substitution | Ratio |
|---|---|---|
| Buttermilk | Milk + vinegar | 1 cup milk + 1 tbsp vinegar |
| Buttermilk | Milk + lemon juice | 1 cup milk + 1 tbsp lemon juice |
| Cream cheese frosting | Vegan cream cheese | 1:1 ratio |
| Butter | Coconut oil | 1:1 ratio (solid state) |
We find that buttermilk substitutions work seamlessly when the original ingredient isn’t available. Mix regular milk with white vinegar or fresh lemon juice, then let it sit for 5 minutes until it curdles slightly. This creates the same acidic environment that buttermilk provides.
Dietary restrictions don’t have to limit our enjoyment of these cupcakes. Vegan cream cheese substitutes beautifully in our frosting recipes, maintaining that signature tangy flavor. Coconut oil based frostings offer another plant based option that pairs wonderfully with the pink velvet base. We recommend using solid coconut oil at room temperature for the best consistency.
These variations ensure our pink velvet cupcakes remain perfect for Valentine’s Day celebrations, birthday parties, or any special occasion where we want to create something both beautiful and delicious.
Conclusion
We’ve shown you everything you need to create stunning pink velvet cupcakes that’ll impress at any gathering. These delightful treats offer the perfect blend of visual appeal and incredible taste that guests will remember long after the last bite.
With our comprehensive guide covering ingredients equipment techniques and storage tips you’re well-equipped to tackle this baking project with confidence. The versatility of pink velvet cupcakes means you can adapt them to suit any dietary need or flavor preference.
Whether you’re planning ahead for a special celebration or looking for a fun weekend baking project these cupcakes deliver consistent bakery-quality results. Now it’s time to gather your ingredients preheat that oven and start creating your own batch of these irresistible pink velvet masterpieces.
Frequently Asked Questions
What makes pink velvet cupcakes different from red velvet cupcakes?
Pink velvet cupcakes are a delightful twist on the classic red velvet, featuring a natural pink color and a hint of vanilla. They maintain the signature fluffy, tender texture and the perfect balance of cocoa and tangy buttermilk flavors that red velvet is known for, but offer a fresh, playful appearance that’s perfect for celebrations and special occasions.
What ingredients do I need to make pink velvet cupcakes?
You’ll need all-purpose flour, granulated sugar, cocoa powder, buttermilk, butter, eggs, vanilla extract, and pink food coloring for the cupcakes. For the cream cheese frosting, gather cream cheese, powdered sugar, butter, and vanilla. Optional decorative elements include pink sprinkles, edible glitter, and fresh berries to enhance the visual appeal.
What equipment is essential for making pink velvet cupcakes?
Essential equipment includes mixing bowls (large and medium), an electric mixer, whisk, standard cupcake pan, cupcake liners, and measuring tools. You’ll also need a toothpick for testing doneness and a wire rack for cooling. Optional frosting equipment includes piping bags and decorative tips for professional-looking results and beautiful presentation.
How should I store pink velvet cupcakes to maintain freshness?
Store cooled cupcakes in an airtight container at room temperature for up to 2 days, or refrigerate for 3-5 days. For longer storage, freeze unfrosted cupcakes for up to 3 months. Always allow refrigerated or frozen cupcakes to come to room temperature before serving for the best texture and flavor experience.
Can I make pink velvet cupcakes ahead of time?
Yes! Bake cupcakes up to two days in advance and store them unfrosted at room temperature or refrigerated. Cream cheese frosting can be prepared ahead and actually improves in flavor when chilled. For best results, frost cupcakes on the day of serving and add final decorative touches just before serving.
What are some variations I can try with pink velvet cupcakes?
You can experiment with different frostings like vanilla buttercream instead of cream cheese frosting. For coloring, try gel food coloring for vibrant pink or beet juice for a natural alternative. You can also use a white cake mix base enhanced with sour cream as a shortcut, or adapt the recipe for various dietary restrictions.
What tips ensure perfect pink velvet cupcakes every time?
Use room temperature ingredients for better mixing, avoid overmixing the batter to maintain fluffiness, and monitor baking time carefully to prevent dryness. Fill cupcake liners properly for even baking, preheat your oven to the correct temperature, and add the baking soda and vinegar mixture last for optimal texture and bakery-quality results.


