

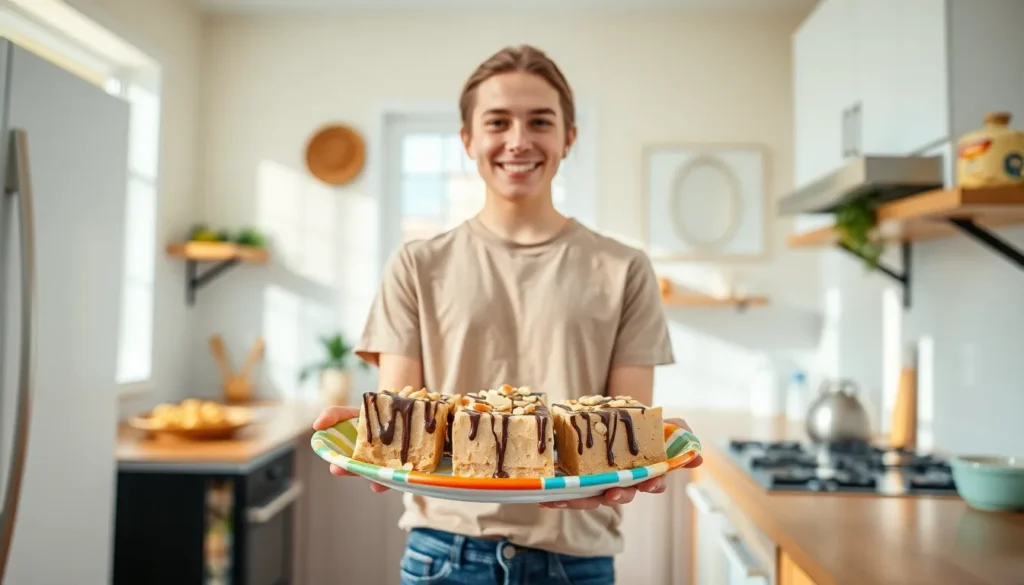
We’ve discovered the perfect solution for those sweltering summer days when you’re craving something sweet yet wholesome. These peanut butter frozen yogurt bars combine the rich, nutty flavor of peanut butter with the tangy freshness of Greek yogurt, creating a treat that’s both indulgent and surprisingly nutritious.
What makes these bars absolutely irresistible is their creamy texture and satisfying protein content. Unlike store-bought frozen treats loaded with artificial ingredients, our homemade version uses simple, wholesome ingredients you probably already have in your pantry. The natural sweetness pairs beautifully with the peanut butter’s richness, while the yogurt adds a delightful tartness that keeps you coming back for more.
We’ll show you how to create these frozen delights with just five ingredients and minimal prep time. They’re perfect for meal prep, kid-friendly snacks, or whenever you need a guilt-free dessert that doesn’t compromise on flavor.
Ingredients
These simple ingredients come together to create irresistibly creamy frozen yogurt bars that rival any store-bought treat. We’ve organized everything by layer to make preparation seamless and efficient.
For the Yogurt Base
- 2 cups plain Greek yogurt (full-fat for best texture)
- 1/3 cup honey or pure maple syrup
- 1 teaspoon vanilla extract
- Pinch of sea salt
For the Peanut Butter Layer
- 1/2 cup natural peanut butter (smooth or crunchy)
- 2 tablespoons honey or maple syrup
- 2 tablespoons coconut oil (melted)
- 1/4 teaspoon vanilla extract
For the Chocolate Drizzle (Optional)
- 1/4 cup dark chocolate chips
- 1 tablespoon coconut oil
- 1 tablespoon chopped peanuts for garnish
Equipment Needed
 1")
We only need a few basic kitchen tools to create these delicious peanut butter frozen yogurt bars. Most of these items are likely already in your kitchen drawer or pantry.
Mixing bowl serves as our primary vessel for combining all ingredients smoothly. We recommend using a medium to large bowl to accommodate the yogurt mixture without spillage.
Spatula becomes essential for spreading the mixture evenly across our baking dish. This tool ensures we achieve uniform thickness throughout each bar.
Baking sheet or 8×8-inch baking dish determines the final shape of our frozen treats. We can choose either option depending on whether we prefer rectangular bars or smaller square portions.
Parchment paper or wax paper lines our chosen dish and prevents sticking. This simple step makes removing the frozen bars effortless once they set completely.
Popsicle sticks offer an optional upgrade for creating handheld popsicle style bars. We insert these into the mixture before freezing for easy grabbing later.
Microwave-safe bowl allows us to melt chocolate safely for any optional drizzling or coating. We use this when adding the chocolate layer to our bars.
Offset spatula provides the perfect tool for flattening and shaping our bars into professional looking treats. This specialized spatula creates smooth surfaces and clean edges that make our homemade bars look bakery quality.
Instructions
 2")
Follow our step-by-step process to create these creamy peanut butter frozen yogurt bars that deliver the perfect balance of tangy and sweet flavors. Each stage builds upon the previous one to ensure professional results every time.
Prep the Pan
Line an 8×8-inch baking dish with parchment paper, leaving some overhang for easy removal. We recommend using a silicone baking mat as an alternative since it prevents sticking effectively. Press the parchment paper into the corners and smooth out any air bubbles to create a clean surface for your bars.
Make the Yogurt Mixture
Combine 2 cups of plain Greek yogurt, 1/3 cup of honey, 1 teaspoon of vanilla extract, and a pinch of sea salt in a large mixing bowl. Whisk the ingredients together until the mixture becomes completely smooth and no streaks remain. The consistency should be thick but spreadable, similar to frosting. Taste and adjust sweetness with additional honey if desired.
Create the Peanut Butter Swirl
Mix 1/2 cup of natural peanut butter, 2 tablespoons of honey, 2 tablespoons of melted coconut oil, and 1/4 teaspoon of vanilla extract in a separate bowl. Stir until the mixture reaches a pourable consistency that flows easily from a spoon. Warm the peanut butter slightly in the microwave for 15-20 seconds if it appears too thick for swirling.
Assemble the Bars
Pour the yogurt mixture into your prepared pan and spread it evenly using an offset spatula. Drop spoonfuls of the peanut butter mixture across the surface in a random pattern. Use a knife or toothpick to create swirl patterns by dragging it through both mixtures in gentle figure-eight motions. Avoid overmixing to maintain distinct swirl patterns.
Freeze and Set
Place the pan in the freezer for at least 4 hours or overnight until the bars become completely solid. Remove from the freezer and lift the bars out using the parchment paper overhang. Cut into 12 equal rectangles using a sharp knife, wiping the blade clean between cuts for neat edges. Store the finished bars in an airtight container in the freezer for up to 3 months.
Directions for Serving
 3")
Our frozen peanut butter yogurt bars reach perfect serving consistency when we follow these simple serving and storage guidelines. We’ve perfected the timing and techniques to ensure optimal texture and flavor every time.
Cutting the Bars
We recommend removing the bars from the freezer and letting them thaw for 5 to 10 minutes before cutting for the smoothest results. Sharp kitchen shears or a warm knife work best to slice through the frozen layers without cracking. We dip our knife in warm water between cuts to maintain clean edges and prevent the bars from sticking to the blade.
Once we’ve achieved the desired bar size, we can serve them immediately for a firmer texture or allow an additional few minutes of thawing for a creamier consistency. The bars should hold their shape while remaining easy to bite through when properly thawed.
Storage Tips
We store our peanut butter frozen yogurt bars in an airtight container in the freezer to maintain freshness and prevent freezer burn. Individual bars can be wrapped in parchment paper before placing in the container to prevent them from sticking together.
| Storage Method | Duration | Temperature |
|---|---|---|
| Freezer (airtight container) | Up to 3 months | 0°F (-18°C) |
| Individual wrapping | Up to 3 months | 0°F (-18°C) |
| Thawing time before serving | 5-10 minutes | Room temperature |
We always let the bars thaw for 5 to 10 minutes before eating to achieve the best texture and flavor. This brief thawing period transforms the bars from rock-solid frozen treats into creamy, scoopable delights that maintain their shape while offering the perfect bite.
Make-Ahead Instructions
 4")
Planning ahead makes serving these frozen yogurt bars effortless for busy weeks or special occasions. We recommend preparing the yogurt mixture and freezing the bars up to a day in advance for optimal texture and flavor development.
Start by completing the entire recipe through the initial freezing step. Allow the bars to freeze solid for at least 2 hours before proceeding with any chocolate coating or additional toppings. This ensures the bars maintain their shape during the coating process.
For chocolate coating preparation, we suggest melting the chocolate and coconut oil mixture just before serving rather than storing pre-coated bars. Fresh chocolate coating provides better texture and prevents the chocolate from becoming too hard in the freezer.
Store the uncoated frozen bars in an airtight container with parchment paper between layers to prevent sticking. This method keeps them fresh for up to one week while maintaining their creamy consistency.
When ready to serve, remove the desired number of bars from the freezer and proceed with the chocolate coating step. Melt 1 cup of chocolate chips with 2 tablespoons of coconut oil in a microwave-safe bowl, heating in 30-second intervals until smooth.
Dip each frozen bar into the melted chocolate coating, allowing excess to drip off before placing on a parchment-lined tray. Return the coated bars to the freezer for 10 minutes to set the chocolate before serving.
For extended storage, wrap individual bars in parchment paper after the chocolate sets completely. This prevents the bars from sticking together and makes grabbing single servings convenient throughout the week.
The make-ahead approach allows the flavors to meld beautifully while saving precious time during busy schedules or when entertaining guests.
Variations and Substitutions
 5")
We love how adaptable these peanut butter frozen yogurt bars are to different dietary needs and flavor preferences. The base recipe serves as an excellent foundation for countless creative variations.
Dairy-Free Options
We can easily transform these bars into dairy-free treats by swapping the Greek yogurt for plant-based alternatives. Coconut yogurt creates the richest and creamiest texture while maintaining that tangy flavor profile we love. Almond yogurt offers a lighter consistency with subtle nutty undertones that complement the peanut butter beautifully. Soy yogurt provides the closest match to traditional Greek yogurt in terms of protein content and thickness. We recommend choosing unsweetened varieties to maintain control over the sweetness level and avoid overly sweet results.
Different Nut Butter Alternatives
We find that experimenting with different nut and seed butters opens up exciting flavor possibilities. Almond butter delivers a slightly sweeter and more delicate nutty taste compared to peanut butter while maintaining that creamy swirl effect. Cashew butter provides an ultra-smooth texture with its naturally mild flavor that pairs wonderfully with vanilla. For those managing nut allergies, sunflower seed butter serves as our go-to substitute that still delivers rich flavor and creamy consistency. We also love trying tahini for a more sophisticated flavor profile that adds depth to the frozen yogurt base.
Add-In Ideas
We encourage adding texture and flavor elements to make these bars uniquely yours. Chopped almonds, walnuts, or pecans provide satisfying crunch that contrasts beautifully with the smooth yogurt base. Dried cranberries, raisins, or chopped cherries introduce natural sweetness and chewy texture that brightens each bite. Mini chocolate chips or finely chopped dark chocolate create an irresistible chocolate peanut butter combination that appeals to all ages. We also love swirling in jam varieties like strawberry or raspberry for fruity bursts that complement the nutty flavors. For a Snickers-inspired version, we mix in chopped peanuts and dates before freezing. Fresh berries work wonderfully when pressed gently into the surface before the final freeze for colorful and nutritious additions.
Troubleshooting Tips
 6")
Creating perfect peanut butter frozen yogurt bars requires attention to a few key details that can make or break your final result. We’ve compiled the most common issues our readers encounter along with proven answers to ensure your bars turn out creamy and delicious every time.
Preventing Icy Texture
The most frequent complaint we hear involves bars that freeze too hard or develop an unpleasant icy consistency. Full-fat Greek yogurt serves as your best defense against this problem since it contains more natural fats that create a smoother texture when frozen. Low-fat varieties lack these essential fats and will produce a harsh, crystalline finish that resembles ice more than creamy frozen yogurt.
Thorough blending also plays a crucial role in achieving the right consistency. We recommend mixing your yogurt base until completely smooth before adding any other ingredients. Air bubbles trapped in poorly mixed yogurt will create ice crystals during the freezing process.
Managing Chocolate Coating Issues
Chocolate coating can present its own set of challenges that frustrate even experienced home cooks. Thick chocolate refuses to coat evenly and often creates unsightly clumps on your bars. Adding a small amount of coconut oil to your melted chocolate creates the perfect consistency for smooth coverage and professional-looking results.
We suggest starting with just one tablespoon of coconut oil per quarter cup of chocolate chips. Heat both ingredients together in short microwave intervals to prevent overheating and maintain the ideal coating texture.
Addressing Natural Peanut Butter Separation
Natural peanut butter contains oils that separate over time and can create problems in your frozen bars if not handled properly. Stir your peanut butter thoroughly before measuring and adding it to your yogurt mixture. This simple step prevents oil pockets from forming and ensures even distribution throughout your bars.
Separated oils can also make your peanut butter layer too runny to create distinct swirls. We recommend using peanut butter at room temperature for the best mixing results.
Maintaining Clean Layers
Layered frozen yogurt bars require exact timing to achieve clean separation between components. Your yogurt base must freeze completely solid before adding any melted chocolate or additional toppings. Rushing this step causes layers to blend together and ruins the visual appeal of your finished bars.
We typically recommend freezing the base layer for at least two hours before proceeding with chocolate coatings or decorative elements.
Removing Bars from Molds
Frozen bars can stick stubbornly to their containers and break apart during removal. Allow your bars to sit at room temperature for five to ten minutes before attempting to remove them from molds or cut them from a larger pan. This brief thawing period softens the edges just enough to release cleanly without compromising the frozen interior.
Running a knife under warm water and wiping it dry between cuts also helps achieve clean edges when portioning your bars into individual servings.
Conclusion
These peanut butter frozen yogurt bars prove that healthy desserts don’t have to compromise on taste or satisfaction. With just five simple ingredients and minimal prep time we’ve created a treat that rivals any store-bought option while delivering superior nutrition and flavor.
The beauty of this recipe lies in its versatility and convenience. Whether you’re meal prepping for the week or need a last-minute dessert for guests these bars deliver every time. The make-ahead friendly nature means you can always have a guilt-free treat ready in your freezer.
We’re confident these bars will become a staple in your summer dessert rotation. The combination of creamy Greek yogurt and rich peanut butter creates that perfect balance of indulgence and nutrition that keeps us coming back for more.
Frequently Asked Questions
What ingredients do I need for peanut butter frozen yogurt bars?
You’ll need 2 cups plain Greek yogurt, 1/3 cup honey or maple syrup, 1 tsp vanilla extract, and a pinch of sea salt for the base. For the peanut butter layer: 1/2 cup natural peanut butter, 2 tbsp honey/maple syrup, 2 tbsp melted coconut oil, and 1/4 tsp vanilla extract. Optional chocolate drizzle requires 1/4 cup dark chocolate chips and 1 tbsp coconut oil.
How long do these frozen yogurt bars need to freeze?
The bars need to freeze for at least 2 hours to become solid enough to cut and serve. For best results, freeze them completely before adding any chocolate coating. Once frozen solid, they can be stored in an airtight container in the freezer for up to 3 months.
Can I make these bars dairy-free?
Yes! Simply substitute the Greek yogurt with plant-based alternatives like coconut, almond, or soy yogurt. Make sure to choose a thick, full-fat variety to maintain the creamy texture. All other ingredients remain the same, making this an easy dairy-free swap.
What equipment do I need to make these bars?
You’ll need basic kitchen equipment: a mixing bowl, spatula for spreading, 8×8-inch baking dish or baking sheet, and parchment paper to prevent sticking. Optional items include popsicle sticks for handheld versions, a microwave-safe bowl for melting chocolate, and an offset spatula for professional-looking finishes.
How do I prevent the bars from getting icy?
Use full-fat Greek yogurt and blend all ingredients thoroughly to prevent icy texture. Make sure to freeze the yogurt base completely before adding toppings to maintain clean layers. Store bars in an airtight container with parchment paper between layers to preserve texture and prevent freezer burn.
Can I substitute different nut butters?
Absolutely! You can use almond butter, cashew butter, sunflower seed butter, or tahini instead of peanut butter. Each will create a unique flavor profile. Make sure to stir natural nut butters well before using to ensure even distribution throughout the bars.
How should I store these frozen yogurt bars?
Store uncoated bars in an airtight container with parchment paper between layers for up to one week in the freezer. For longer storage, wrap individual bars in parchment paper. If adding chocolate coating, prepare it fresh just before serving for the best texture and appearance.


