

Imagine biting into the most decadent square of pure chocolate-hazelnut bliss – that’s exactly what our Nutella fudge delivers. This irresistible treat transforms the beloved spread we all know and love into a rich, creamy confection that’ll have you reaching for seconds before you’ve finished your first piece.
We’ve perfected this simple yet spectacular recipe that requires just a handful of ingredients and minimal effort. The beauty of Nutella fudge lies in its simplicity – the iconic spread does all the heavy lifting while we add just enough supporting ingredients to create that perfect fudgy texture. No candy thermometer needed, no complicated techniques required.
Whether you’re planning a special occasion dessert or simply craving something sweet, this homemade Nutella fudge satisfies every chocolate lover’s dream. It’s the kind of treat that makes gift-giving effortless and dessert tables unforgettable.
Equipment Needed
Making our Nutella fudge requires basic kitchen equipment that most home bakers already have on hand. We need an 8×8 inch square baking pan to create perfectly sized fudge squares with the ideal thickness.
A medium saucepan serves as our primary cooking vessel for combining and heating ingredients. Heavy-bottomed pans work best since they distribute heat evenly and prevent scorching during the melting process.
We recommend having a wooden spoon or silicone spatula ready for stirring the mixture. These tools won’t scratch our cookware and handle the thick consistency of melted chocolate beautifully.
Parchment paper becomes essential for lining our baking pan. This simple step ensures easy removal of the finished fudge and prevents sticking to the pan surface.
A sharp knife will help us cut clean squares once our fudge has set completely. We suggest using a large chef’s knife for smooth cuts through the dense texture.
Measuring cups and spoons ensure accurate ingredient proportions for consistent results every time. Digital kitchen scales provide even more precision if we prefer weighing ingredients rather than using volume measurements.
Finally we need access to a refrigerator for the chilling process that transforms our warm mixture into firm sliceable fudge. Room temperature storage works for short periods but refrigeration speeds up the setting time significantly.
Ingredients
 1")
We keep our Nutella fudge recipe beautifully simple with just a handful of ingredients that deliver maximum flavor. Our base recipe calls for three essential components that create the perfect creamy texture and rich taste.
Main Ingredients:
- 10 to 12 oz milk chocolate chips or dark chocolate wafers
- ½ cup Nutella (or 3 tablespoons for a lighter hazelnut flavor)
- 14 oz can sweetened condensed milk
Optional Flavor Enhancers:
- 1 teaspoon vanilla extract
- Flaky sea salt for topping
- 2 tablespoons unsalted butter
| Ingredient | Amount | Purpose |
|---|---|---|
| Chocolate chips/wafers | 10-12 oz | Base chocolate foundation |
| Nutella | ½ cup or 3 tbsp | Signature hazelnut flavor |
| Sweetened condensed milk | 14 oz can | Creamy binding agent |
| Vanilla extract | 1 tsp | Flavor enhancement |
| Flaky salt | To taste | Texture contrast |
| Unsalted butter | 2 tbsp | Extra richness |
We arrange our ingredients in the order we use them during preparation. The chocolate provides our fudge’s foundation while Nutella delivers that distinctive hazelnut sweetness we crave. Our sweetened condensed milk acts as the binding agent that transforms separate ingredients into smooth creamy fudge.
The beauty of this recipe lies in its flexibility with measurements. We can adjust the Nutella quantity based on how pronounced we want the hazelnut flavor to be. Adding vanilla extract enhances the overall taste profile while a sprinkle of flaky salt creates delightful texture contrast against the smooth fudge.
Prep Work
 2")
Setting up our workspace properly ensures smooth fudge making and prevents common mishaps. We’ll prepare our pan and organize our ingredients before we begin cooking.
Preparing the Pan
We start by lining our 8×8 inch square baking pan with aluminum foil or parchment paper. This step allows for easy removal once our fudge sets completely. We extend the lining slightly over the edges to create handles for lifting. Our lined pan should sit ready on the counter where we can quickly pour the hot fudge mixture without delay.
Measuring Ingredients
We organize our ingredients by measuring everything before we start heating. Our recipe variations offer flexibility depending on our preferred intensity and cooking method.
| Recipe Method | Chocolate | Nutella | Condensed Milk | Additional Ingredients |
|---|---|---|---|---|
| Simple Joy | 11 oz milk chocolate chips | ½ cup | 14 oz can | 1 tsp vanilla |
| Grilled Cheese Social | 10 oz dark chocolate wafers | ½ cup | 14 oz can | ¼ tsp flaky salt |
| Cooking in the Midwest | 1 cup bittersweet chocolate chips | 1 cup | 14 oz can | 1 tsp vanilla, 3 tbsp butter, sea salt |
We measure our chocolate chips or wafers first since they form our fudge base. Our Nutella should be at room temperature for easier mixing. We keep our sweetened condensed milk can nearby with the top removed and ready to pour. Salt and vanilla extract should sit within arm’s reach for quick addition during the final mixing stage.
Instructions
 3")
We’ll walk you through each step to create this irresistible Nutella fudge that sets perfectly every time. The process requires careful attention to temperature and timing for the smoothest results.
Making the Fudge Base
We begin by combining the chocolate chips and sweetened condensed milk in our medium saucepan over low heat. Stir the mixture continuously using a wooden spoon to prevent scorching as the chocolate melts slowly. The combination should reach a smooth and glossy consistency within 3 to 5 minutes of gentle heating.
For microwave preparation, we place the chocolate and sweetened condensed milk in a microwave-safe bowl. Heat the mixture in 20 to 30 second intervals, stirring thoroughly between each session until completely smooth. This method typically requires 3 to 4 heating cycles depending on your microwave’s power.
Adding Nutella
We incorporate the Nutella directly into our melted chocolate base while it remains warm. Stir the mixture vigorously to ensure the Nutella blends completely without leaving streaks or lumps. The hazelnut spread should melt seamlessly into the chocolate, creating a uniform color throughout.
Add the vanilla extract and butter at this stage if using these optional ingredients. Mix everything together until the fudge base achieves a silky, consistent texture that coats our stirring spoon evenly.
Final Mixing
We pour the completed fudge mixture into our prepared 8×8 inch baking pan lined with parchment paper. Use a silicone spatula to spread the fudge evenly across the surface, ensuring consistent thickness throughout. Gently tap the pan on the counter to release any air bubbles trapped in the mixture.
Sprinkle flaky sea salt over the surface if desired, pressing it lightly into the fudge with clean fingertips. Refrigerate the pan for 2 to 3 hours until the fudge sets completely and feels firm to the touch. Cut into squares using a sharp knife for clean edges.
Directions for Setting
 4")
Once we’ve poured our silky Nutella fudge mixture into the prepared pan, the setting process becomes crucial for achieving that perfect firm texture. Proper cooling and refrigeration ensure our fudge develops the ideal consistency for clean slicing.
Cooling Process
We begin the setting process by placing our filled pan directly into the refrigerator rather than allowing it to cool at room temperature. This immediate refrigeration method helps our fudge mixture harden effectively and prevents any separation of ingredients that might occur during slower cooling.
The cold temperature causes the fats in our chocolate and Nutella to solidify gradually while the sweetened condensed milk maintains the fudge’s creamy binding properties. We recommend covering our pan with plastic wrap or aluminum foil during refrigeration to prevent our fudge from absorbing any refrigerator odors.
Refrigeration Time
Our Nutella fudge requires a minimum of 2 hours in the refrigerator to set properly into a firm sliceable consistency. But, we often find that 3 hours produces even better results, especially when working with mixtures that contain extra butter or have a particularly creamy consistency.
| Setting Time | Consistency Result |
|---|---|
| 2 hours | Firm enough to cut |
| 3 hours | Optimal firmness |
| Overnight | Maximum firmness |
We can test our fudge’s readiness by gently pressing the surface with our finger. When properly set, the fudge should feel firm to the touch and spring back slightly rather than leaving an indentation. If our fudge still feels too soft after the initial 2 hours, we simply continue refrigerating until it reaches the desired firmness.
Cutting and Serving
 5")
After our Nutella fudge has set to perfection we can transform it into beautiful squares ready for serving. The cutting and presentation process requires a few simple techniques to achieve professional-looking results.
How to Cut Clean Squares
We remove the fudge from the refrigerator after it has set for 2-3 hours and carefully peel off the parchment paper. Using a sharp knife becomes essential for achieving clean cuts without crumbling or tearing the fudge surface.
| Setting Time | Temperature | Result |
|---|---|---|
| 2-3 hours | Refrigerated | Firm and ready to cut |
| Up to 1 week | Refrigerated | Maintains freshness |
We dip our knife in hot water before each cut to prevent the fudge from sticking to the blade. Wiping the knife clean between cuts ensures each square maintains crisp edges and uniform appearance. Cutting the fudge into bite-sized squares makes serving easier and creates perfect portion sizes for guests.
Serving Suggestions
We arrange our fudge squares on a decorative platter or wooden board for an appealing visual presentation. Sprinkling flaky sea salt over the squares adds flavor contrast and enhances the chocolate-hazelnut taste profile.
Pairing our Nutella fudge with hot coffee or cold milk creates a delightful dessert combination that balances the rich sweetness. We store leftover squares in an airtight container in the refrigerator to maintain their firm texture and fresh taste.
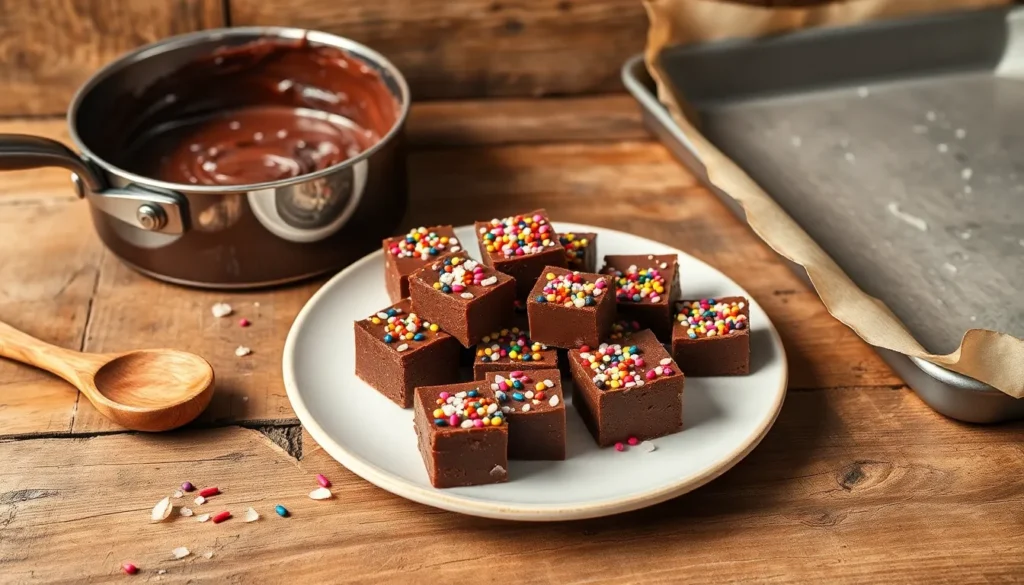
For party presentations we can coat individual squares with colorful sprinkles to add festive appeal. The fudge serves as an excellent centerpiece for dessert tables or as individual treats for special occasions.
Storage Tips
 6")
Proper storage ensures our Nutella fudge maintains its rich texture and delicious flavor for weeks. We can store our homemade fudge using several methods depending on how long we plan to keep it.
Room Temperature Storage
We can keep our fudge at room temperature for up to 2 weeks when stored correctly. Place the fudge squares in an airtight container and store them in a cool dry place away from direct sunlight. This method works best for fudge we plan to consume within a few days.
| Storage Method | Duration | Container Type |
|---|---|---|
| Room Temperature | 1-2 weeks | Airtight container |
| Refrigeration | 2-3 weeks | Airtight container + wrapping |
| Freezer | Up to 3 months | Tightly wrapped + freezer-safe container |
Refrigerator Storage
Our Nutella fudge stays fresh for 2 to 3 weeks when refrigerated properly. We should place each piece in an airtight container and consider wrapping individual squares in plastic wrap or wax paper. This extra wrapping prevents moisture absorption and maintains the fudge’s smooth texture. The fudge will become firmer in the refrigerator but returns to its ideal consistency at room temperature.
Freezer Storage
For long term storage we can freeze our fudge for up to 3 months. Wrap each piece tightly in plastic wrap then place them in a freezer safe container or heavy duty freezer bag. This double protection prevents freezer burn and preserves the fudge’s quality. Thaw frozen fudge in the refrigerator overnight before serving.
Handling and Safety Tips
We should always use clean utensils when handling our stored fudge to prevent contamination. Before consuming stored fudge we need to inspect it for any signs of spoilage including mold odd smells or texture changes. The hazelnut content in Nutella doesn’t significantly affect storage life compared to other fudge varieties.
Keep our fudge away from strong odors as it can absorb flavors from other foods. Temperature changes can cause the fudge to develop a grainy texture so we should avoid moving it frequently between different storage locations.
Make-Ahead Instructions
 7")
Planning ahead makes entertaining effortless when we prepare our Nutella fudge in advance. We can create this decadent treat up to several weeks before serving by following proper storage techniques.
Refrigerator Storage: Our fudge stays fresh in the refrigerator for up to 15 days when stored correctly. We wrap individual pieces in plastic wrap or parchment paper to prevent moisture absorption. Storing the wrapped squares in an airtight container maintains optimal texture and flavor.
Freezer Storage: Freezing extends our fudge’s life for up to 2 months without compromising quality. We tightly wrap the entire pan or individual pieces in plastic wrap followed by aluminum foil. Placing the wrapped fudge in a freezer safe container prevents freezer burn and maintains freshness.
Thawing Process: We thaw frozen fudge gradually in the refrigerator for best results. This process takes approximately 2 to 3 hours for individual pieces or 4 to 6 hours for whole batches. Room temperature thawing works faster but may create condensation that affects texture.
Preparation Timeline: We recommend making our fudge 2 to 3 days before serving for optimal flavor development. The chocolate and hazelnut flavors meld beautifully during this resting period. Cutting the fudge just before serving ensures the cleanest presentation and prevents the pieces from sticking together during storage.
Quality Maintenance: We inspect stored fudge before serving to ensure freshness. Properly stored fudge maintains its rich texture and intense Nutella flavor throughout the storage period. Using clean utensils when handling prevents contamination and extends shelf life.
Troubleshooting Common Issues
 8")
Even experienced bakers occasionally encounter challenges when making Nutella fudge. We’ve compiled answers to the most common problems that can arise during the fudge-making process.
Fudge Too Soft
Insufficient cooking or cooling time typically causes fudge to remain too soft after preparation. We recommend refrigerating your fudge for at least 2 to 3 hours to allow proper setting. Your fudge needs adequate time to firm up before cutting into squares.
If your fudge still feels too soft after the recommended cooling period, place it in the freezer for 15 to 20 minutes. This extra firming time helps achieve the perfect sliceable texture we desire for clean cuts.
Fudge Too Hard
Overcooking your mixture or using excessive amounts of chocolate often results in overly hard fudge. We can fix this issue by gently remelting the fudge with a small amount of sweetened condensed milk or heavy cream. Add one tablespoon at a time until you achieve the desired consistency.
Stir the mixture thoroughly during reheating to ensure even distribution of the added liquid. Once properly mixed, pour the fudge back into your prepared pan and refrigerate until set.
Uneven Texture
Incorrect temperature control or insufficient stirring during preparation creates uneven texture in your finished fudge. We prevent this by stirring the mixture consistently during the heating process and avoiding overheating.
Temperature monitoring becomes crucial when using stovetop methods rather than microwave preparation. If you notice uneven texture in your completed fudge, remelt the entire batch and cool it again following proper stirring techniques.
Additional texture issues include graininess from incompletely melted ingredients and oily separation from overheated butter or chocolate. Ensure all components reach full incorporation before removing from heat source.
Variations
 9")
Our basic Nutella fudge recipe serves as the perfect foundation for countless delicious adaptations. We can easily transform this simple treat by incorporating different chocolates, creating visual swirls, or adding exciting textures.
White Chocolate Nutella Fudge
We swap traditional dark or milk chocolate chips for white chocolate chips to create this sweeter and creamier variation. The preparation method remains identical to our original recipe, but the flavor profile shifts dramatically. White chocolate provides a milder chocolate taste that beautifully complements Nutella’s rich hazelnut notes.
This elegant variation appeals to those who prefer less intense chocolate flavors. We recommend using 10 to 12 oz of high-quality white chocolate chips for the best results. The final fudge develops a pale golden color with subtle chocolate undertones that allow the Nutella’s hazelnut character to shine through.
Nutella Swirl Fudge
We create this visually striking variation by preparing a classic chocolate or vanilla fudge base and swirling Nutella through it before chilling. The technique involves warming 3 to 4 tablespoons of Nutella slightly to make it easier to swirl.
After pouring our base fudge mixture into the prepared pan, we dot the surface with spoonfuls of warmed Nutella. Using a knife or toothpick, we create decorative swirls by dragging through the Nutella in figure-eight patterns. This method produces beautiful streaks throughout the fudge, offering alternating bites of smooth chocolate and intense hazelnut chocolate flavor.
Crunchy Nutella Fudge
We add texture to our fudge by stirring in various crunchy elements before pouring the mixture into the pan. Popular additions include chopped hazelnuts, sliced almonds, crushed cookies, or even crispy cereal pieces.
The key timing involves adding these ingredients after removing our fudge mixture from heat but before it begins to set. We typically incorporate 1/2 to 3/4 cup of our chosen crunchy element, folding it gently to distribute evenly throughout the mixture. This creates a satisfying textural contrast between the creamy fudge base and the crispy additions in every bite.
Chopped hazelnuts work particularly well since they echo Nutella’s primary flavor profile. We can also combine multiple textures, such as crushed graham crackers with chopped almonds, for more complex results.
Conclusion
We’ve covered everything you need to create the perfect Nutella fudge right in your own kitchen. From gathering the basic ingredients to mastering the setting process this recipe proves that impressive desserts don’t require complicated techniques or professional skills.
The beauty of this fudge lies in its adaptability. Whether you prefer the classic version or want to experiment with white chocolate swirls or crunchy additions there’s a variation that’ll satisfy your taste buds. Plus with proper storage techniques you can prepare batches weeks ahead of time.
Now it’s time to grab your ingredients and start creating this irresistible treat. Your friends and family will be amazed by the rich chocolate-hazelnut flavor and you’ll have a go-to recipe that never fails to impress.
Frequently Asked Questions
What ingredients do I need to make Nutella fudge?
You’ll need 10-12 oz of milk chocolate chips or dark chocolate wafers, ½ cup of Nutella, and one 14 oz can of sweetened condensed milk. Optional ingredients include 1 teaspoon vanilla extract, flaky sea salt for topping, and 2 tablespoons of unsalted butter for enhanced flavor and texture.
What kitchen equipment is required for making Nutella fudge?
Essential equipment includes an 8×8 inch square baking pan, a medium saucepan, wooden spoon or silicone spatula, parchment paper, sharp knife, and measuring tools. You’ll also need access to refrigeration for setting the fudge and achieving the proper firm texture.
How long does Nutella fudge need to set in the refrigerator?
The fudge requires a minimum of 2 hours in the refrigerator to set properly, though 3 hours is recommended for optimal firmness. If the fudge still feels too soft after the initial time, continue refrigerating until it reaches the desired consistency.
How should I store Nutella fudge to keep it fresh?
Store at room temperature for up to 2 weeks in an airtight container, refrigerate for 2-3 weeks with pieces individually wrapped, or freeze for up to 3 months when tightly wrapped in a freezer-safe container. Always use clean utensils and avoid exposure to strong odors.
Can I make Nutella fudge ahead of time?
Yes, Nutella fudge can be prepared several weeks in advance. For best results, make it 2-3 days before serving to allow optimal flavor development. Store properly wrapped in the refrigerator or freezer, and inspect for freshness before serving.
What should I do if my Nutella fudge turns out too soft or too hard?
If too soft, refrigerate longer or add more chocolate during melting. If too hard, remelt gently with a small amount of sweetened condensed milk or butter. Ensure consistent stirring and proper temperature control during the cooking process for best results.
What are some popular variations of Nutella fudge?
Popular variations include White Chocolate Nutella Fudge for a sweeter profile, Nutella Swirl Fudge for visual appeal, and Crunchy Nutella Fudge with added nuts or cookies. You can also adjust the Nutella quantity or add vanilla extract and sea salt for customization.
How do I cut and serve Nutella fudge properly?
Use a sharp knife dipped in hot water to achieve clean cuts and maintain a professional appearance. Arrange pieces on a decorative platter and consider adding toppings like flaky sea salt or sprinkles. Pair with hot coffee or cold milk for an enhanced dessert experience.


