

We’ve discovered the perfect dessert that combines two incredible flavors: lemon raspberry cheesecake. This stunning dessert brings together the bright citrusy punch of fresh lemons with the sweet-tart burst of juicy raspberries, all nestled in a rich and creamy cheesecake base.
There’s something magical about the way these flavors complement each other. The zesty lemon cuts through the richness of the cream cheese while the raspberries add beautiful color and natural sweetness. We’re talking about a dessert that’s both elegant enough for special occasions and simple enough to satisfy those everyday cravings.
What makes this recipe truly special is how it balances indulgence with freshness. You’ll get that classic New York-style cheesecake texture we all love, but with a lighter, more vibrant taste profile that won’t leave you feeling overly heavy. Trust us – once you make this lemon raspberry cheesecake, it’ll become your go-to showstopper dessert.
Ingredients
We’ve organized our ingredients into three simple sections to make your baking process smooth and efficient. Each component plays a crucial role in creating the perfect balance of flavors and textures.
For the Graham Cracker Crust
- 1 1/2 cups graham cracker crumbs (about 12 full crackers)
- 1/4 cup granulated sugar
- 6 tablespoons unsalted butter, melted
- 1/4 teaspoon salt
For the Lemon Cheesecake Filling
- 24 ounces cream cheese, softened to room temperature
- 3/4 cup granulated sugar
- 3 large eggs, room temperature
- 1/2 cup sour cream, room temperature
- 1/3 cup fresh lemon juice (about 2 large lemons)
- 2 tablespoons lemon zest (about 2 large lemons)
- 1 teaspoon vanilla extract
- 2 tablespoons all purpose flour
For the Raspberry Topping
- 2 cups fresh raspberries (or 12 ounces frozen, thawed and drained)
- 1/3 cup granulated sugar
- 2 tablespoons cornstarch
- 2 tablespoons water
- 1 tablespoon fresh lemon juice
- Fresh raspberries for garnish
Equipment Needed

Creating our lemon raspberry cheesecake requires exact tools that ensure smooth preparation and professional results. We recommend gathering all equipment before starting to streamline the baking process.
9-inch springform pan serves as our most essential tool for this recipe. The high sides accommodate the generous filling while the removable bottom allows easy release without damaging our beautiful cheesecake. We always recommend this pan size for optimal thickness and presentation.
Electric mixer becomes crucial for achieving the silky smooth texture we desire in our cheesecake filling. Stand mixers work exceptionally well for beating cream cheese to the perfect consistency and incorporating other ingredients without overworking the mixture.
Sifter helps us achieve uniform texture when combining dry ingredients like flour and baking powder. This tool prevents lumps and ensures even distribution throughout our batter.
Standard oven handles both crust prebaking and the main cheesecake baking process. We rely on consistent temperature control for the gentle baking our cheesecake requires.
Refrigerator space plays a vital role in the final stages of our recipe. Our cheesecake needs adequate chilling time to set properly and develop its signature firm yet creamy texture.
Additional helpful tools include mixing bowls of various sizes, measuring cups and spoons, a rubber spatula for gentle folding, and a wire cooling rack. These supporting items make our preparation more efficient and help achieve bakery quality results at home.
Instructions

Now that we have our ingredients organized and equipment ready, let’s walk through each step to create this stunning lemon raspberry cheesecake. We’ll guide you through every stage from preparing the crust to the final assembly.
Preparing the Crust
We start by preheating our oven to 325°F for optimal baking conditions. In a medium mixing bowl, we combine 2 cups of graham cracker crumbs with 1/4 cup of sugar until evenly distributed. Next, we pour in 12 tablespoons of melted butter and mix thoroughly until the mixture resembles wet sand and holds together when pressed.
We then press this mixture firmly into the bottom of our 9-inch springform pan, creating an even layer that extends slightly up the sides. Using the bottom of a measuring cup helps us achieve a compact and uniform crust. We prebake this crust for 10 minutes to set the foundation for our cheesecake.
Making the Lemon Cheesecake Filling
We begin the filling by ensuring our 24 ounces of cream cheese reaches room temperature for smooth blending. Using our electric mixer, we beat the cream cheese with 1 cup of sugar on medium speed until the mixture becomes completely smooth and fluffy, approximately 3-4 minutes.
We add 1/4 cup of fresh lemon zest and 1/4 cup plus 2 tablespoons of lemon juice to infuse our filling with bright citrus flavor. Next, we incorporate 1 cup of sour cream and 1/2 cup of heavy cream, mixing until just combined. Finally, we beat in 4 large eggs one at a time at room temperature, ensuring each egg fully incorporates before adding the next.
Baking the Cheesecake
We pour our lemon cheesecake filling over the prepared crust, smoothing the top with a rubber spatula. For best results, we place our springform pan in a larger roasting pan and add hot water halfway up the sides to create a water bath that prevents cracking.
We bake our cheesecake at 325°F for approximately 1 hour and 15 minutes, watching for the center to be just set with a slight jiggle when gently shaken. The edges should appear firm while the center remains slightly soft. We turn off the oven and crack the door slightly, allowing the cheesecake to cool gradually for 1 hour.
Preparing the Raspberry Topping
While our cheesecake cools, we prepare the raspberry topping using 12 ounces of thawed raspberries. We blend the raspberries with 2-3 tablespoons of sugar to taste, creating a smooth coulis. For a seedless version, we strain the mixture through a fine mesh sieve.
Alternatively, we can use fresh raspberries by gently mashing half of them with sugar and leaving the remainder whole for varied texture. We refrigerate our raspberry topping until ready to use, allowing the flavors to meld together.
Assembly and Final Steps
Once our cheesecake reaches room temperature, we carefully remove it from the water bath and run a thin knife around the edges to prevent cracking during cooling. We refrigerate the cheesecake for at least 8 hours or overnight to achieve the perfect firm texture.
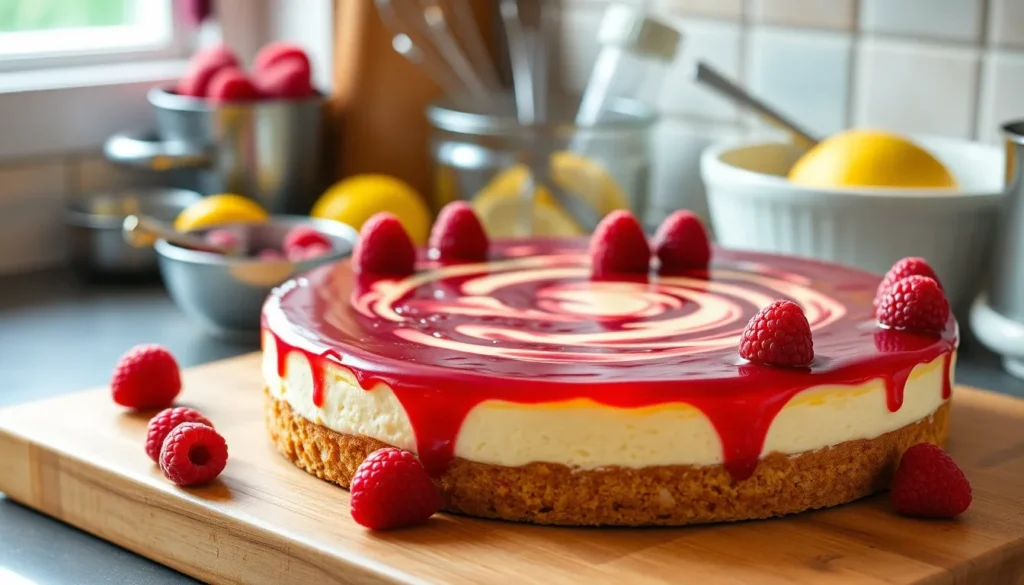
Before serving, we release the springform pan sides and transfer our cheesecake to a serving plate. We spread or dollop our raspberry topping over the surface, creating an attractive swirl pattern with a knife if desired. We garnish with fresh raspberries and a dollop of whipped cream for an elegant presentation that showcases the beautiful contrast of colors and flavors.
Make-Ahead Instructions

We highly recommend preparing our lemon raspberry cheesecake in advance since it requires proper chilling time to achieve the perfect texture and consistency. Planning ahead allows the flavors to meld beautifully while ensuring your dessert is ready when needed.
Baked Cheesecake Preparation Timeline
For traditional baked cheesecakes, we suggest preparing the entire cheesecake layer at least one day before serving. The cheesecake needs to chill overnight in the refrigerator to set properly. After assembling with the raspberry topping, allow the completed dessert to chill overnight again before serving.
No-Bake Version Timeline
When making our no-bake version, the cheesecake requires a minimum of 3 hours chilling time. We recommend chilling overnight for optimal results and texture development. No-bake cheesecakes can be stored safely in the refrigerator for up to 4 days when properly covered.
Component Preparation Schedule
The raspberry purée component can be made one day ahead of time, which streamlines your preparation process. Preparing this element in advance allows you to focus on assembling the final dessert without rushing through multiple steps.
Storage Requirements
| Storage Method | Temperature | Duration |
|---|---|---|
| Baked Cheesecake | Below 40°F (4°C) | Up to 4 days |
| No-Bake Cheesecake | Below 40°F (4°C) | Up to 4 days |
| Raspberry Purée | Below 40°F (4°C) | Up to 2 days |
Store baked cheesecakes in the refrigerator at temperatures below 40°F (4°C) to ensure food safety. Wrap no-bake cheesecakes in plastic wrap first, then aluminum foil for extended storage periods.
Essential Make-Ahead Tips
Always ensure complete chilling before serving to prevent cracking or structural issues. Frozen cheesecakes should be thawed gradually in the refrigerator rather than at room temperature. This gradual thawing process maintains the dessert’s integrity and prevents condensation from affecting the texture.
Storage Tips

We understand that proper storage is essential for maintaining the quality and freshness of your lemon raspberry cheesecake. Our comprehensive storage guidelines ensure your dessert remains delicious for days or even months.
Refrigerator Storage
Store your finished cheesecake in an airtight container in the refrigerator for optimal freshness. The dessert maintains its quality for 3 to 5 days when stored properly. Place the container on a stable shelf away from strong-smelling foods to prevent flavor absorption.
Freezer Storage
For extended storage, we recommend freezing your cheesecake in an airtight container or wrapping it tightly in plastic wrap and aluminum foil. Frozen cheesecakes maintain their quality for up to 2 months in the freezer. Label the container with the date to track storage time.
| Storage Method | Duration | Container Type |
|---|---|---|
| Refrigerator | 3-5 days | Airtight container |
| Freezer | Up to 2 months | Airtight container or wrapped |
| Raspberry Curd | 4 days (fridge) | Airtight container |
| Raspberry Curd | 2 months (frozen) | Airtight container |
Raspberry Topping Storage
Store any leftover raspberry curd or topping separately in an airtight container. The topping keeps fresh in the refrigerator for up to 4 days. For longer storage, freeze the raspberry component for up to 2 months.
Thawing Instructions
Thaw frozen cheesecake by placing it on the counter for several hours or transferring it to the refrigerator overnight. Gradual thawing prevents condensation from forming on the surface and maintains the dessert’s texture.
Pre-Serving Preparation
We recommend adding final decorative touches just before serving to prevent damage during storage. Fresh raspberries and delicate garnishes maintain their appearance best when applied at the last moment.
Serving Suggestions

We find that this lemon raspberry cheesecake shines brightest when served with minimal adornment. The vibrant raspberry swirl creates such stunning visual appeal that additional decorations become unnecessary. Fresh whipped cream dolloped alongside each slice provides a delightful textural contrast to the dense cheesecake filling.
Whole raspberries scattered around the plate add bursts of color and complement the raspberry flavors already present in the dessert. We recommend adding a few fresh mint leaves to each serving for enhanced visual appeal and a subtle aromatic element that brightens the overall presentation.
| Serving Context | Why It Works |
|---|---|
| Summer picnics | Lighter texture than traditional cheesecakes |
| Outdoor BBQs | Easy to transport and serve |
| Casual gatherings | No fancy toppings required |
The cheesecake’s balanced flavor profile means we don’t need typical additions like lemon curd or fruit compotes. Each slice delivers the perfect harmony of creamy texture and bright citrus notes without overwhelming the palate.
For more casual occasions we suggest cutting the cheesecake into bars rather than traditional wedges. This approach makes serving easier at buffet-style gatherings and allows guests to enjoy smaller portions if desired.
The dessert performs exceptionally well at outdoor events due to its lighter composition compared to dense New York-style cheesecakes. We’ve found that the Greek yogurt addition creates an even creamier texture while maintaining structural integrity during transport.
Room temperature serving brings out the fullest flavors though the cheesecake remains delicious when served chilled directly from the refrigerator. The raspberry elements provide natural sweetness that pairs beautifully with the tangy lemon base regardless of serving temperature.
Recipe Variations

We can transform our classic lemon raspberry cheesecake into several delicious variations to suit different preferences and occasions. Each version maintains the signature tangy-sweet balance while offering unique textures and presentation styles.
Berry Swirl Option
The raspberry swirl creates both visual appeal and bursts of concentrated flavor throughout our cheesecake. We make this by combining 1 cup fresh raspberries with 2 tablespoons sugar in a small saucepan over medium heat. The mixture cooks for 3-4 minutes until the berries break down and release their juices.
After straining the mixture to remove seeds we create a smooth raspberry puree. We then dollop spoonfuls of this puree over our prepared cheesecake batter and use a knife to create elegant swirl patterns. The key is gentle movements that create marbled designs without overmixing the flavors.
Blueberries offer an excellent alternative for those wanting to experiment with different berry flavors. We prepare blueberry swirl using the same technique but increase the cooking time to 5-6 minutes since blueberries have thicker skins. Mixed berry swirls combining raspberries and blackberries create complex flavor profiles that complement the lemon base beautifully.
No-Bake Version
Our no-bake lemon raspberry cheesecake delivers the same creamy satisfaction without requiring oven time. We start with 24 ounces of room temperature cream cheese beaten until completely smooth. Heavy whipping cream gets whipped to soft peaks separately before we fold it into the cream cheese mixture.
| Component | Preparation Time | Chilling Time |
|---|---|---|
| No-Bake Filling | 15 minutes | 3-4 hours minimum |
| Raspberry Topping | 10 minutes | 30 minutes |
| Total Assembly | 25 minutes | 4 hours total |
The crust receives a light 8-minute bake at 350°F to achieve a golden toasted flavor that contrasts beautifully with the cool filling. Alternatively we can skip baking entirely and refrigerate the pressed crust for 30 minutes to set properly.
This version requires at least 4 hours of chilling time for the filling to achieve the proper consistency. We recommend preparing it the night before serving to ensure the flavors meld completely. The silky smooth texture makes this variation particularly appealing during warm weather when we want to avoid heating up the kitchen.
Fresh raspberry topping works exceptionally well with the no-bake version since both components remain cool and refreshing. We can also create raspberry coulis by blending fresh berries with powdered sugar for a smoother presentation that drizzles beautifully over individual slices.
Troubleshooting Tips

Even experienced bakers encounter challenges when making lemon raspberry cheesecake. We’ve compiled answers to the most common issues that arise during preparation and baking.
Crust Problems
Soggy or Crumbly Crust
When your crust fails to hold together properly, the issue typically stems from inadequate binding. We recommend crushing graham crackers to fine crumbs before combining with melted butter. The texture should resemble wet sand that holds together when pressed. If the mixture appears too dry, add melted butter one tablespoon at a time until proper consistency develops.
Uneven Crust Thickness
Press the crust mixture firmly and evenly across the bottom of your springform pan. We suggest using the bottom of a measuring cup to create uniform thickness and eliminate air pockets that could cause weakness in the structure.
Texture Issues
Lumpy Filling
Room temperature cream cheese blends smoothly while cold cream cheese creates lumps. We always remove cream cheese from refrigeration 2 hours before mixing. Beat cream cheese and sugar until completely smooth before adding other ingredients gradually. Scrape bowl sides frequently to ensure even mixing.
Filling Won’t Thicken
Proper thickening occurs when cream cheese and sugar combine thoroughly. We whisk these ingredients until the mixture appears light and fluffy. Add double cream and lemon juice slowly while continuing to mix. The consistency should coat the back of a spoon when properly thickened.
Baking Complications
Cracked Surface
Overmixing or overbaking causes unsightly cracks across the cheesecake surface. We avoid overbeating eggs and fold them gently into the mixture. After baking, leave the cheesecake in the oven with the door slightly open for 30 minutes to cool gradually. This prevents rapid temperature changes that create cracks.
Uneven Baking
Temperature fluctuations lead to uneven cooking throughout the cheesecake. We use a water bath to maintain consistent oven temperature during baking. Place the springform pan in a larger roasting pan and add hot water halfway up the sides. Check that water doesn’t leak into the cheesecake pan by wrapping the bottom with aluminum foil.
Temperature Control Answers
Overbaked Cheesecake
Reduce oven temperature by 25 degrees if your cheesecake consistently overbakes. We test doneness by gently shaking the pan. The center should jiggle slightly while edges remain set. The internal temperature should reach 150°F when measured with an instant-read thermometer.
Underbaked Center
Extend baking time in 5-minute increments if the center remains too loose. We cover the top with aluminum foil to prevent overbrowning while the center finishes cooking.
Cooling and Storage Issues
Condensation on Surface
Moisture droplets form when warm cheesecake meets cold air. We cool cheesecake gradually at room temperature before refrigerating. Cover with plastic wrap only after the surface feels completely cool to prevent condensation buildup.
Raspberry Topping Separation
Cornstarch prevents raspberry topping from becoming watery. We cook the raspberry mixture until it thickens and coats the back of a spoon. Allow the topping to cool completely before spreading over the cheesecake to prevent melting the filling underneath.
Conclusion
We’ve walked you through everything you need to create this stunning lemon raspberry cheesecake that’s sure to impress at any gathering. From the buttery graham cracker crust to the silky lemon filling topped with vibrant raspberry goodness this dessert delivers both visual appeal and incredible flavor.
The beauty of this recipe lies in its flexibility – whether you choose the traditional baked version or opt for the no-bake alternative you’ll end up with a dessert that balances tangy citrus notes with sweet berry flavors perfectly. The make-ahead nature means you can prepare it stress-free for your next event.
With our detailed troubleshooting tips and storage guidance you’re equipped to handle any challenges that might arise. This cheesecake isn’t just a dessert – it’s a showstopper that’ll have your guests asking for the recipe every single time.
Frequently Asked Questions
What makes lemon raspberry cheesecake special?
This dessert combines refreshing citrus from lemons with the sweet-tartness of raspberries in a creamy cheesecake base. The flavors enhance each other perfectly, creating an elegant dessert that’s both indulgent and fresh. It offers classic cheesecake texture with a lighter taste, making it suitable for special occasions and everyday cravings.
What equipment do I need to make this cheesecake?
Essential equipment includes a 9-inch springform pan, electric mixer, sifter, standard oven, and adequate refrigerator space. Additional helpful tools are mixing bowls, measuring cups and spoons, rubber spatula, and wire cooling rack. These tools ensure smooth preparation and professional-quality results at home.
Can I make this cheesecake ahead of time?
Yes, this cheesecake is perfect for make-ahead preparation. Traditional baked versions should chill overnight after assembly, while no-bake versions need at least 3 hours (overnight is optimal). The raspberry purée can be made a day ahead to streamline preparation and allow flavors to meld properly.
How should I store leftover cheesecake?
Store finished cheesecake in an airtight container in the refrigerator for 3-5 days. For longer storage, freeze for up to 2 months. The raspberry topping can be stored separately for up to 4 days refrigerated or 2 months frozen. Thaw frozen cheesecake gradually in the refrigerator.
What are the best serving suggestions?
Serve at room temperature for fullest flavors. The cheesecake shines with minimal adornment – fresh whipped cream, whole raspberries, and mint leaves make excellent garnishes. For buffet-style gatherings, cut into bars for easier serving. The balanced flavor profile makes it perfect for summer picnics and outdoor BBQs.
Can I make variations of this recipe?
Yes, you can create a berry swirl version using blueberries or mixed berries for different flavors and textures. There’s also a no-bake version that offers creamy texture without baking, requiring only crust prebaking and at least 4 hours chilling time. Both variations maintain the signature tangy-sweet balance.
What if my cheesecake cracks while baking?
Prevent cracking by using a water bath during baking and controlling oven temperature carefully. Ensure cream cheese is at room temperature before mixing, and don’t overmix the filling. Gradual cooling also helps prevent surface cracks. If cracks do appear, the raspberry topping will beautifully cover them.
How long does the raspberry topping last?
Fresh raspberry topping stays good in the refrigerator for up to 4 days when stored separately from the cheesecake. It can also be frozen for up to 2 months. Make the topping a day ahead to save time, and add fresh raspberry garnishes just before serving for best appearance.


