

We’ve discovered the perfect dessert that transforms your daily coffee routine into an elegant Japanese treat. Coffee jelly – or kōhī zerī – originated in Japan during the Taishō era and has become a beloved dessert that perfectly balances bitter coffee flavors with silky smooth gelatin texture.
This refreshing dessert offers the ideal solution for coffee lovers seeking something beyond ordinary sweets. We love how coffee jelly delivers that familiar caffeine kick while providing a cool and satisfying finish that’s perfect for warm afternoons or after rich meals.
What makes Japanese coffee jelly truly special is its versatility – you can enjoy it plain for pure coffee essence or dress it up with fresh cream and vanilla ice cream for an indulgent parfait-style presentation. We’ll show you how to create this sophisticated dessert that’s surprisingly simple to make at home.
What Is Japanese Coffee Jelly
Japanese coffee jelly transforms regular brewed coffee into an elegant gelatin dessert that captivates both coffee lovers and dessert enthusiasts. We create this delightful treat by combining strong coffee with unflavored gelatin to form a smooth, jiggly texture that melts beautifully on the tongue.
The dessert originated in Japan during the early 1900s and quickly became a staple in Japanese cafes and restaurants. Coffee jelly offers a sophisticated way to enjoy coffee flavors without the heat, making it particularly popular during Japan’s humid summers.
We typically prepare coffee jelly with a balance of bitter coffee notes and subtle sweetness. The gelatin provides a unique mouthfeel that sets it apart from traditional liquid coffee drinks. Each spoonful delivers concentrated coffee flavor followed by a refreshing, cooling sensation.
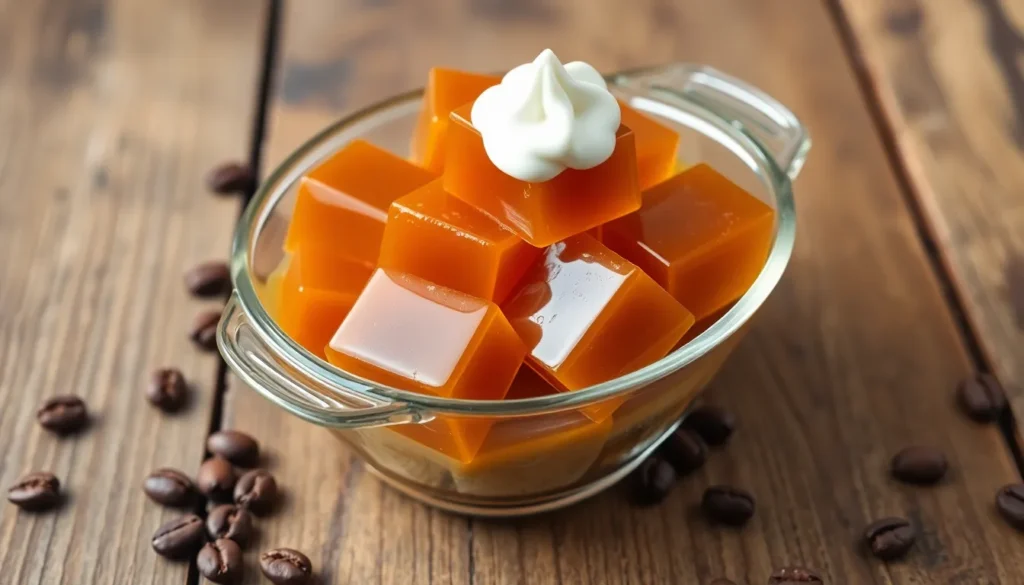
Modern Japanese coffee jelly comes in various presentations. Some versions feature a firm, sliceable consistency perfect for elegant plating, while others maintain a softer, more pudding-like texture. We often serve it in clear glasses to showcase its beautiful amber color and crystal-clear appearance.
The dessert’s versatility allows for many serving styles. Traditional presentations include plain coffee jelly with a dollop of whipped cream, while contemporary versions might incorporate layers of different flavors or decorative toppings. Coffee shops frequently serve it as an afternoon refreshment or post-meal palate cleanser.
Coffee jelly’s caffeine content varies depending on the strength of coffee used in preparation. Most recipes retain enough caffeine to provide a gentle energy boost while delivering the cooling satisfaction of a chilled dessert.
Ingredients

We’ll need two sets of ingredients to create this refreshing Japanese dessert: one for the coffee jelly base and another for the optional whipped cream topping. Our ingredient list focuses on traditional Japanese preparation methods while offering modern alternatives.
For the Coffee Jelly
- 2 cups strong brewed coffee (or 2-4 tablespoons instant coffee dissolved in 2 cups hot water)
- 1 packet (7 grams) unflavored gelatin powder or 2 teaspoons kanten (agar) powder
- 1/4 cup granulated sugar (adjust to taste preference)
- 1/4 cup cold water (for blooming gelatin)
- 1 3/4 cups boiling water
For the Whipped Cream Topping
- 1 cup heavy cream (35% fat content)
- 2 tablespoons granulated sugar (optional, for sweetening)
- 1/2 teaspoon whipped cream stabilizer (optional, for longer holding time)
Equipment Needed

Creating authentic Japanese coffee jelly requires minimal kitchen equipment that most home cooks already possess. We’ll walk you through each essential tool needed to achieve that perfect jiggly texture and professional presentation.
Basic Mixing Equipment
- Small mixing bowl – Essential for dissolving gelatin properly without lumps
- Spoon – Used for initial mixing and stirring ingredients
- Whisk – Ensures smooth incorporation of all components
Cooking Equipment
- Saucepan – Required for heating the coffee mixture to proper temperature
- Shallow dish – Allows even setting and easy cutting into cubes
- Glass serving dishes – Traditional presentation showcases the beautiful amber color
Most recipes call for standard kitchen tools that deliver consistent results. The shallow dish proves particularly important since it enables uniform cooling and creates the ideal thickness for cutting perfect cubes. Glass serving vessels highlight the dessert’s elegant appearance while allowing guests to appreciate the crystal clear texture.
We recommend having measuring cups and spoons readily available for precise ingredient ratios. A fine mesh strainer can help ensure silky smooth results if your coffee contains any grounds. These simple tools transform basic ingredients into an impressive dessert that captures the essence of traditional Japanese coffee culture.
Instructions

Creating authentic Japanese coffee jelly requires careful attention to each step for the perfect texture and flavor balance. We’ll guide you through this straightforward process that transforms simple ingredients into an elegant dessert.
Prep the Coffee Base
We start by brewing 2 cups of strong coffee using your preferred method or dissolving 3 tablespoons of instant coffee in 2 cups of hot water. The coffee should be significantly stronger than your regular drinking strength to ensure the flavor remains prominent after dilution with gelatin. Add 1/4 cup granulated sugar to the hot coffee and stir until completely dissolved. For more intense flavor we recommend using espresso powder instead of regular instant coffee. Allow the sweetened coffee mixture to cool slightly while we prepare the gelatin.
Dissolve the Gelatin
We sprinkle 2 packets (2 tablespoons) of unflavored gelatin over 1/2 cup of cold water in a small mixing bowl. Let the mixture sit for 5 minutes until the gelatin becomes spongy and swells. Pour 1/2 cup of boiling water over the softened gelatin and whisk vigorously until the granules completely dissolve. Japanese cooks often use kanten powder as an alternative which requires dissolving 1 teaspoon in hot water following package directions. The gelatin mixture should be completely smooth with no visible lumps remaining.
Combine and Set
We slowly pour the dissolved gelatin into the warm coffee mixture while whisking continuously to prevent lumps from forming. Strain the combined mixture through a fine mesh strainer into a shallow 8×8 inch dish or divide among 6 individual serving glasses. Cover the containers and refrigerate for 3 to 6 hours until the jelly is completely set and springs back when lightly touched. The setting time depends on the depth of your container with thinner layers setting faster than deeper ones.
Prepare the Topping
We cut the set coffee jelly into perfect cubes using a sharp knife if using a shallow dish or leave whole in individual glasses. For traditional presentation we whip 1 cup of heavy cream with 2 tablespoons of sugar until soft peaks form. Alternatively we can serve with cold milk, unsweetened oat milk, or vanilla ice cream for different flavor profiles. The contrast between the bitter coffee jelly and creamy topping creates the signature taste experience that makes this dessert so beloved in Japanese cuisine.
Directions for Serving

We present our coffee jelly using traditional Japanese serving methods that highlight the dessert’s elegant appearance and rich flavor. Our perfectly set coffee jelly cuts cleanly into uniform cubes using a sharp knife dipped in warm water between cuts.
For classic presentation, we arrange the coffee jelly cubes in clear glass dishes that showcase their beautiful amber color. Each serving receives approximately 4-6 cubes depending on the size of our molds. We pour our prepared toppings over the cubes just before serving to maintain the contrast between textures.
Sweetened condensed milk creates the most traditional Japanese presentation. We drizzle 2-3 tablespoons over each serving, allowing the creamy sweetness to pool around the coffee cubes. The white milk creates a stunning visual contrast against the dark jelly.
Whipped cream offers another popular serving option. We spoon dollops of our freshly prepared cream alongside the cubes or create elegant swirls on top. This method works particularly well for special occasions or when we want to impress guests.
Cold milk or unsweetened oat milk provides a lighter alternative that doesn’t mask the coffee flavor. We pour just enough to surround the base of the cubes, typically 1/4 cup per serving.
Our garnishing touches complete the presentation beautifully. Fresh mint leaves add a pop of color and aromatic contrast. Single coffee beans placed strategically on each serving reinforce the dessert’s coffee theme while adding visual interest.
Temperature plays a crucial role in our serving success. We ensure our coffee jelly remains well chilled from refrigerator to table. The contrast between the cool jelly and room temperature toppings creates the perfect flavor balance that makes this dessert so appealing.
We serve our coffee jelly within the optimal storage window to guarantee the best texture and flavor experience for our guests.
| Storage Timeline | Days |
|---|---|
| Optimal freshness | 2-3 days |
| Maximum storage | 5 days |
Make-Ahead Tips

We love how Japanese coffee jelly becomes the perfect dessert for busy schedules since it requires minimal active preparation time. The beauty of this dessert lies in its simple assembly followed by hands-off chilling time that allows us to focus on other tasks.
Planning becomes effortless when we prepare coffee jelly up to 3 days before serving. The gelatin structure actually improves during the first 24 hours as flavors meld and the texture reaches its optimal firmness. We recommend making our coffee jelly at least 4 hours before serving to ensure complete setting.
Storage requirements remain straightforward throughout the make-ahead process. Keep the coffee jelly covered in the refrigerator to prevent it from absorbing other flavors and maintain its smooth surface. Glass containers work best for storage since they don’t retain odors and allow us to monitor the jelly’s appearance.
| Timeline | Storage Method | Quality Notes |
|---|---|---|
| 4-6 hours | Covered in refrigerator | Minimum setting time |
| 1-2 days | Airtight container | Peak texture and flavor |
| 3-5 days | Covered tightly | Good quality, serve promptly |
Flavor variations expand our options when preparing coffee jelly in advance. We can experiment with espresso powder for intensified coffee notes or switch to decaf coffee for evening entertaining without compromising the make-ahead benefits. Each variation maintains the same chilling requirements and storage guidelines.
Assembly timing maximizes freshness when we plan our serving presentation. Cut the coffee jelly into cubes just before serving to maintain clean edges and optimal texture. Prepare whipped cream or other toppings separately and add them at the last moment to preserve their individual characteristics and prevent the dessert from becoming watery.
Storage Instructions

Proper storage ensures your coffee jelly maintains its perfect texture and rich flavor. We recommend storing your finished coffee jelly in an airtight container or covering it with plastic wrap before refrigerating.
The storage duration depends on which gelling agent you use for your coffee jelly. Kanten or agar-based jelly typically lasts about 2 days in the refrigerator. Gelatin-based coffee jelly can be stored for 5-7 days when kept in a sealed container in the fridge.
| Gelling Agent | Storage Duration | Storage Method |
|---|---|---|
| Kanten/Agar | 2 days | Airtight container, refrigerated |
| Gelatin | 5-7 days | Sealed container, refrigerated |
We strongly advise against freezing coffee jelly as this changes the texture of the gelatin and compromises the dessert’s signature smooth consistency. The freezing process creates ice crystals that break down the gel structure.
Store your coffee jelly in glass containers when possible to maintain optimal quality and prevent any flavor transfer from plastic containers. Keep the jelly covered at all times to prevent it from absorbing other refrigerator odors.
For best results we suggest consuming your coffee jelly within the first few days of preparation when the texture remains at its peak firmness. Always check the jelly’s appearance and smell before serving to ensure freshness.
If you plan to add toppings like whipped cream prepare these separately and add them just before serving to maintain their individual textures and prevent the cream from breaking down.
Variations and Flavor Ideas

Coffee jelly’s versatility makes it perfect for creative customization and flavor experimentation. We can transform this classic dessert into many delightful variations that suit different tastes and occasions.
Sweetened Coffee Jelly
Traditional Japanese coffee jelly combines black coffee with sugar and gelatin for a balanced sweet and bitter profile. We can adjust sweetness levels using granulated sugar, brown sugar, or condensed milk to create different flavor experiences. Condensed milk offers a richer, creamier profile that mellows the coffee’s intensity while adding luxurious texture.
For enhanced flavor complexity, we steep coffee with mint tea during preparation. This technique infuses subtle herbal notes that complement the coffee’s robust character. The sweetening process occurs while dissolving gelatin in the coffee base, allowing flavors to meld completely before refrigeration sets the final texture.
Iced Coffee Float Style
Coffee jelly transforms into a refreshing float when served in tall glasses with cold milk poured over the cubes. We can use sweetened condensed milk or half-and-half to create layered desserts reminiscent of iced coffee floats. This presentation style highlights the jelly’s distinctive jiggly texture while blending coffee and creamy flavors seamlessly.
Adding ice cubes or crushed ice provides extra chill and visual appeal. The contrast between the firm coffee jelly cubes and flowing milk creates an captivating textural experience that mimics popular coffee shop beverages.
Layered Presentation
Layered coffee jelly desserts showcase visual appeal through clear glassware that displays alternating layers of jelly and cream. We recommend using transparent serving vessels to highlight the beautiful amber coffee color against white cream layers. Toppings such as whipped cream, flavored syrups, or cocoa powder add decorative finishing touches.
Mint leaves or cinnamon sticks provide aromatic flair and elegant garnish options. For frappuccino inspired treats, we blend jelly cubes with frozen coffee or float them in sweetened milk. Cutting set jelly into small cubes before layering allows for easy mixing and even distribution throughout the dessert. Experimentation with flavor infusions like vanilla, caramel, or mint encourages creative customization that reflects personal preferences.
Troubleshooting Common Issues

Even experienced home cooks encounter challenges when making coffee jelly. Understanding these common problems helps us achieve perfect results every time.
Coffee Jelly Won’t Set Properly
Temperature plays a crucial role in gelatin activation. We need to ensure our water reaches a full boil before dissolving the gelatin mixture. If the coffee jelly remains liquid after 4 hours of refrigeration the gelatin ratio may be insufficient. Standard recipes require 1 tablespoon of unflavored gelatin per 2 cups of liquid for proper setting.
Room temperature ingredients can prevent proper gelling. We must allow the coffee mixture to cool slightly before adding dissolved gelatin but not so much that the gelatin begins to set prematurely. The ideal temperature for combining these ingredients falls between 140°F and 160°F.
Texture Issues and Grainy Results
Undissolved gelatin creates an unpleasant grainy texture in our finished dessert. We should always bloom gelatin in cold water for 5 minutes before adding it to hot liquid. Whisking vigorously while combining ensures complete dissolution.
Using boiling water directly on gelatin can damage its setting properties. We recommend removing coffee from heat before adding the bloomed gelatin mixture. Gentle stirring for 2-3 minutes guarantees smooth incorporation.
Overly Bitter or Weak Coffee Flavor
Strong coffee concentration is essential for proper flavor balance in coffee jelly. We need approximately 2 tablespoons of instant coffee per cup of water or brew coffee at double strength when using fresh grounds. Weak coffee results in bland jelly that lacks the characteristic rich taste.
Sugar adjustment can remedy overly bitter results. We typically add 2-4 tablespoons of granulated sugar per 2 cups of coffee depending on personal preference and coffee strength used.
Separation and Layering Problems
Improper cooling can cause ingredient separation in our coffee jelly. We should allow the mixture to cool to room temperature before refrigerating. Placing hot mixture directly in the refrigerator creates temperature shock that disrupts the gelling process.
Air bubbles trapped during mixing create unsightly holes and uneven texture. We strain the mixture through a fine mesh strainer before pouring into molds. This step removes any undissolved particles and creates a smooth professional appearance.
Difficulty Removing from Molds
Proper greasing prevents sticking when we want to unmold coffee jelly. Light coating of neutral oil or cooking spray applied before pouring ensures easy release. We can also dip the bottom of molds in warm water for 10-15 seconds to loosen the edges.
Sharp knife edges help create clean cuts when portioning coffee jelly. We dip our knife in warm water between cuts to prevent dragging and tearing the delicate gelatin structure.
Conclusion
Japanese coffee jelly offers us a perfect balance of simplicity and sophistication that’s hard to find in other desserts. We’ve discovered how this elegant treat transforms ordinary coffee into something extraordinary with just a few basic ingredients and minimal effort.
What makes coffee jelly truly special is its versatility – we can enjoy it as a refreshing afternoon pick-me-up or dress it up for special occasions. The make-ahead nature means we’re always ready to impress guests or treat ourselves to something delightful.
Whether we’re coffee enthusiasts looking for new ways to enjoy our favorite beverage or home cooks seeking an impressive yet approachable dessert we’ll find coffee jelly delivers on all fronts. It’s a testament to how Japanese culinary tradition can elevate simple ingredients into something memorable and satisfying.
Frequently Asked Questions
What is coffee jelly?
Coffee jelly is a Japanese dessert made by combining strong brewed coffee with unflavored gelatin to create a smooth, jiggly texture. This refreshing treat originated in Japan during the Taishō era and became popular in Japanese cafes during the early 1900s. It offers a unique way to enjoy coffee flavors in a cool, gelatin-based dessert form.
How long does coffee jelly last in the refrigerator?
Coffee jelly can be stored in the refrigerator for different durations depending on the gelling agent used. Kanten or agar-based coffee jelly lasts about 2 days, while gelatin-based versions can be stored for 5-7 days. For optimal freshness and texture, it’s best consumed within the first 2-3 days when covered in an airtight container.
Can I make coffee jelly ahead of time?
Yes, coffee jelly is perfect for make-ahead preparation. You can prepare it up to 3 days in advance, and the gelatin structure actually improves in the first 24 hours as flavors meld together. Store it covered in the refrigerator, preferably in glass containers, and prepare toppings just before serving for the best presentation.
What equipment do I need to make coffee jelly?
You only need basic kitchen equipment that most home cooks already have: a small mixing bowl, spoon, whisk, saucepan, shallow dish for setting, and glass serving dishes. Additionally, measuring cups, measuring spoons, and a fine mesh strainer are recommended for precise ingredient ratios and smooth results.
What are the best toppings for coffee jelly?
Popular toppings include sweetened condensed milk for a classic presentation, whipped cream for special occasions, and lighter alternatives like cold milk or unsweetened oat milk. You can also serve it with ice cream for a more indulgent treat. The contrast between the bitter coffee jelly and creamy toppings enhances the dessert’s appeal.
Can I freeze coffee jelly?
No, freezing coffee jelly is not recommended as it alters the texture and compromises the dessert’s signature smooth consistency. The freezing process breaks down the gelatin structure, resulting in a grainy, unpleasant texture. Always store coffee jelly in the refrigerator instead of the freezer for best results.
Why didn’t my coffee jelly set properly?
Common reasons for setting issues include incorrect gelatin ratios, water that’s too hot when adding gelatin, insufficient cooling time, or improper mixing. Ensure you follow the recipe’s gelatin measurements precisely, let the coffee cool slightly before adding dissolved gelatin, and allow adequate refrigeration time (at least 2-4 hours) for proper setting.
Can I customize the flavor of coffee jelly?
Yes, coffee jelly is highly versatile for customization. You can adjust sweetness levels with different sugars, use espresso powder for stronger flavor, try decaf coffee for caffeine-free versions, or even infuse mint tea for added complexity. Experiment with different coffee strengths and flavor combinations to create your perfect version.


