

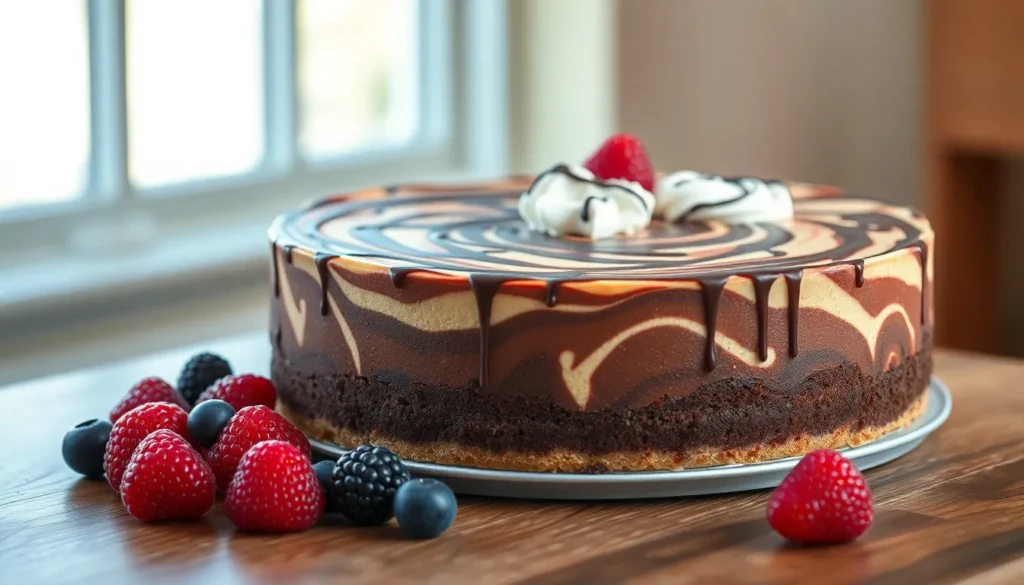
There’s nothing quite like the moment when you slice into a perfectly crafted chocolate swirl cheesecake and watch those gorgeous marbled patterns reveal themselves. We’ve perfected this show-stopping dessert that combines the rich creaminess of classic New York-style cheesecake with decadent ribbons of chocolate that create an absolutely irresistible masterpiece.
This isn’t just any ordinary cheesecake – it’s the kind of dessert that transforms dinner parties into memorable occasions and turns casual gatherings into celebrations. The contrast between the tangy cream cheese filling and the deep chocolate swirls creates a flavor profile that’ll have your guests asking for the recipe before they’ve even finished their first bite.
We’ll walk you through every step of creating this bakery-quality dessert in your own kitchen. From achieving that silky smooth texture to mastering the perfect chocolate swirl technique you’ll discover why this recipe has become our go-to showstopper for special occasions.
Ingredients
We’ve carefully selected each ingredient to create the perfect balance of creamy cheesecake and rich chocolate swirl. These simple components work together to deliver that stunning marbled appearance and luxurious taste we’re after.
For the Crust
- 1½ cups graham cracker crumbs
- ¼ cup granulated sugar
- 6 tablespoons unsalted butter, melted
- ¼ teaspoon salt
For the Cheesecake Filling
- 32 ounces cream cheese, room temperature
- 1 cup granulated sugar
- 4 large eggs, room temperature
- 1 cup sour cream, room temperature
- 2 teaspoons vanilla extract
- ¼ cup all-purpose flour
- ¼ teaspoon salt
For the Chocolate Swirl
- 4 ounces dark chocolate, chopped
- 2 tablespoons heavy cream
- 2 tablespoons unsalted butter
- 1 tablespoon powdered sugar
Equipment Needed

Creating our chocolate swirl cheesecake requires exact tools that ensure professional results and smooth preparation. We’ve assembled this essential equipment list to help you achieve that perfect creamy texture and stunning marbled appearance.
Our most critical tool is a 9-inch springform pan, which allows easy removal of the delicate cheesecake without damaging its structure. The removable bottom and spring-loaded sides make unmolding effortless after chilling.
We rely on a food processor to create perfectly fine graham cracker crumbs for our crust base. This powerful appliance breaks down the crackers into uniform particles that bind beautifully with butter and sugar.
A stand mixer or hand mixer becomes indispensable when beating our cream cheese filling to silky smoothness. The consistent mixing action eliminates lumps and incorporates air for that signature light texture we’re after.
For melting our chocolate swirl component, we use a microwave-safe bowl that provides controlled heating without scorching. This method gives us the smooth, glossy chocolate needed for those gorgeous swirl patterns.
Our large roasting pan serves as the foundation for a water bath technique that prevents surface cracking during baking. The gentle, moist heat environment keeps our cheesecake perfectly smooth on top.
We keep a silicone spatula handy for scraping bowl sides clean and smoothing the batter surface before adding our chocolate swirl. The flexible material won’t scratch our mixing bowls or damage non-stick surfaces.
Finally, parchment paper and non-stick cooking spray ensure easy release from our pan while protecting the bottom crust from sticking. These simple tools prevent frustrating removal problems that could ruin our beautiful presentation.
Instructions

We’ll guide you through each step to create this stunning chocolate swirl cheesecake with professional results. Follow these detailed instructions to achieve the perfect creamy texture and beautiful marbled appearance.
Prepare the Crust
Preheat your oven to 350°F. Combine graham cracker crumbs with sugar and salt in a medium bowl. Pour melted butter over the mixture and stir until evenly moistened. Press the mixture firmly into the bottom of your prepared 9-inch springform pan using the bottom of a measuring cup. Create an even layer that extends slightly up the sides. Bake the crust for 10 minutes until lightly golden. Remove from oven and set aside to cool while preparing the filling.
Make the Cheesecake Filling
Beat cream cheese in your stand mixer or large bowl until completely smooth and free of lumps. Add brown sugar and beat until fully incorporated. Mix in sour cream, flour, vanilla extract, and maple syrup until the mixture is uniform. Lightly beat eggs in a separate bowl before adding them to the cream cheese mixture. Beat on low speed until just combined to avoid incorporating excess air. Scrape down the sides of the bowl to ensure even mixing.
Create the Chocolate Swirl
Melt dark chocolate and heavy cream together in a microwave-safe bowl using 30-second intervals, stirring between each interval until smooth. Allow the chocolate ganache to cool slightly to room temperature. Transfer ½ cup of the prepared cheesecake batter to a small bowl and mix with the cooled chocolate ganache until well combined. This chocolate mixture will create our beautiful swirl pattern throughout the cheesecake.
Assemble the Cheesecake
Pour half of the plain cheesecake batter over the prepared crust, spreading it evenly with a spatula. Drop spoonfuls of the chocolate mixture over the vanilla batter layer. Pour the remaining vanilla batter on top. Add more dollops of chocolate mixture across the surface. Use a knife to create swirl patterns by gently dragging it through the batter in figure-eight motions. Avoid over-mixing to maintain distinct swirl patterns.
Bake the Cheesecake
Place the springform pan inside a large roasting pan and fill the outer pan with 1 inch of hot water to create a water bath. Bake for 50-65 minutes until the center is just set but still slightly jiggly when gently shaken. Turn off the oven and crack the door open, allowing the cheesecake to cool gradually for 1 hour. Remove from water bath and cool completely at room temperature before refrigerating for at least 4 hours or overnight.
Cooling and Chilling

Once we remove our chocolate swirl cheesecake from the oven, proper cooling becomes crucial for preventing cracks and achieving the perfect texture. We allow the cheesecake to cool in the oven with the door slightly ajar for about 30 minutes. This gradual temperature change prevents the sudden shock that often causes unsightly cracks across the surface.
After the initial oven cooling, we transfer our cheesecake to a wire rack for complete room temperature cooling. This process takes approximately 1-2 hours depending on the size of our cheesecake and ambient kitchen temperature. During this time, we run a knife around the edges to loosen the cheesecake from the springform pan sides, ensuring smooth removal later.
Room temperature cooling must be complete before we move to refrigeration. We cover our cheesecake and place it in the refrigerator for the essential chilling phase. The minimum chilling time varies between recipes, with some requiring at least 4 hours while others recommend 8 hours or overnight chilling for optimal results.
| Cooling Stage | Time Required | Temperature |
|---|---|---|
| Oven cooling (door ajar) | 30 minutes | Gradually decreasing |
| Room temperature cooling | 1-2 hours | Room temperature |
| Refrigerator chilling | 4-8 hours minimum | 35-40°F |
Proper storage extends our cheesecake’s life up to one week in the refrigerator. We wrap it with plastic wrap to prevent absorption of other refrigerator flavors and maintain its pristine taste.
For longer storage, we freeze our cheesecake after overnight refrigerator chilling. We wrap it first in plastic wrap, then aluminum foil, and store it in the freezer for up to three months. Thawing requires overnight refrigerator time before serving, ensuring we maintain the creamy texture we worked so hard to achieve.
Make-Ahead Instructions

Planning ahead transforms this chocolate swirl cheesecake into the perfect stress-free dessert for entertaining. We recommend preparing this showstopping dessert up to 3 days before serving to allow optimal flavor development.
Preparing the Crust in Advance
The graham cracker crust benefits from advance preparation. We can make and bake the crust up to 2 days ahead of time. Store the cooled crust in its springform pan at room temperature wrapped tightly with plastic wrap. This approach prevents the crust from becoming soggy and maintains its perfect texture.
Full Cheesecake Assembly Options
Our chocolate swirl cheesecake actually improves with time. Prepare the complete cheesecake 1 to 3 days before your event for best results. The flavors meld beautifully during extended refrigeration while the texture becomes incredibly smooth and creamy.
| Timeline | Storage Method | Duration |
|---|---|---|
| Same day serving | Refrigerate minimum 4 hours | Up to 8 hours |
| Next day serving | Wrap and refrigerate | 24 hours |
| Extended storage | Wrap tightly in refrigerator | Up to 5 days |
| Long term storage | Freeze wrapped cheesecake | Up to 3 months |
Freezing for Extended Storage
We can freeze the completed cheesecake for up to three months without compromising quality. Wrap the cooled cheesecake first in plastic wrap then in aluminum foil to prevent freezer burn. Place the wrapped cheesecake in a freezer-safe container for extra protection.
Thawing Instructions
Thaw frozen cheesecake overnight in the refrigerator for optimal results. Never thaw at room temperature as this can cause condensation and affect the texture. Remove from the freezer 12 to 24 hours before serving depending on the size. The gradual thawing process preserves the creamy consistency we worked hard to achieve.
Final Serving Preparation
Remove the cheesecake from refrigeration 15 to 30 minutes before serving. This brief room temperature rest makes slicing easier and enhances the flavors. Run a warm knife under hot water and wipe clean between cuts for picture-perfect slices every time.
Storage Tips

We understand that storing your chocolate swirl cheesecake properly ensures it maintains its creamy texture and rich flavor for days to come. Proper storage techniques protect your dessert investment and allow you to enjoy this decadent treat at its peak quality.
Refrigeration Guidelines
Wrapping the cheesecake in plastic wrap prevents it from absorbing unwanted refrigerator odors that could compromise its delicate flavor profile. We recommend storing your chocolate swirl cheesecake in the refrigerator for optimal freshness and safety.
| Storage Method | Duration | Key Requirements |
|---|---|---|
| Refrigeration | 3-5 days | Plastic wrap covering |
| Extended refrigeration | Up to 1 week | Airtight wrapping |
| Freezing | Up to 3 months | Double wrap protection |
Allow the cheesecake to cool completely at room temperature for several hours before refrigeration to prevent cracking and maintain that silky smooth texture we’ve worked so hard to achieve.
Freezing for Long-Term Storage
Freezing extends your cheesecake’s life significantly when done correctly. We start by placing the cheesecake in the freezer for one to two hours until it becomes firm to the touch.
Once firm, we wrap the entire cheesecake in plastic wrap or aluminum foil to create a barrier against freezer burn. This double protection method involves placing the wrapped cheesecake inside a ziplock bag or airtight container for maximum freshness preservation.
Thawing Instructions
Thawing requires patience to maintain the cheesecake’s perfect consistency. We recommend transferring frozen cheesecake to the refrigerator and allowing it to thaw overnight for best results.
Room temperature thawing works for quicker serving needs and takes approximately 45 minutes before the cheesecake reaches optimal serving temperature.
Serving Enhancement
Serving your stored cheesecake with complementary toppings elevates the entire dessert experience. We suggest offering whipped cream, rich caramel sauce, or decadent chocolate sauce alongside each slice to enhance the chocolate swirl flavors that have had time to meld during storage.
Serving Suggestions

We recommend presenting your chocolate swirl cheesecake with elegant toppings that complement its rich flavor profile. Drizzled melted chocolate creates the most visually stunning presentation when allowed to cascade down the sides of each slice. The chocolate drizzle enhances the existing swirl pattern while adding an extra layer of decadent flavor.
Our favorite combination pairs whipped cream with warm caramel sauce to balance the tangy cream cheese with sweet richness. These toppings create textural contrast that makes each bite more interesting. We suggest using freshly whipped cream rather than store-bought for the best results.
Customizing your chocolate swirl cheesecake becomes simple when you experiment with different chocolate varieties. Dark chocolate intensifies the dessert’s sophistication while milk chocolate appeals to those who prefer milder flavors. We find that matching your drizzle chocolate to the swirl chocolate creates the most cohesive taste experience.
Additional garnish options transform your cheesecake into a restaurant-quality dessert. Fresh berries provide acidic brightness that cuts through the creamy richness. Crushed graham crackers sprinkled around the plate echo the crust flavors while adding textural interest.
Temperature plays a crucial role in serving excellence. We recommend removing the cheesecake from refrigeration 15-20 minutes before serving to allow optimal flavor development. Room temperature cheesecake slices more cleanly and tastes more vibrant than cold portions straight from the fridge.
| Serving Enhancement | Preparation Time | Visual Appeal Rating |
|---|---|---|
| Melted chocolate drizzle | 5 minutes | 9/10 |
| Whipped cream and caramel | 10 minutes | 8/10 |
| Fresh berry garnish | 3 minutes | 7/10 |
| Crushed graham crackers | 2 minutes | 6/10 |
Individual slice presentation becomes effortless when you warm your knife between cuts. Clean cuts prevent the swirl pattern from smearing and maintain the cheesecake’s elegant appearance. We always wipe the knife clean after each slice to ensure professional-looking results.
Troubleshooting Tips

Even experienced bakers encounter challenges when creating the perfect chocolate swirl cheesecake. We’ve compiled answers to the most common issues that can arise during preparation and baking.
Preventing Cracks in Your Cheesecake
Cracking remains the most frequent problem we see with cheesecakes. Overbaking causes the surface to split as moisture evaporates too quickly. We recommend checking your cheesecake when it still has a slight jiggle in the center rather than waiting for complete firmness.
Temperature fluctuations create stress on the cheesecake surface. Allow your cheesecake to cool slowly by turning off the oven and leaving the door slightly open. Room temperature ingredients blend more easily and require less mixing time which reduces the risk of incorporating excess air that can lead to cracking.
Achieving the Perfect Chocolate Swirl
Inconsistent swirling often results from using the wrong type of chocolate or inadequate technique. Chocolate chips don’t melt as smoothly as baking chocolate and can create lumpy textures in your swirl. We always use melted baking chocolate for better spreading and integration.
The swirling technique requires a gentle touch. Create figure 8 patterns with a knife or skewer while avoiding overmixing which can muddy the distinct swirl appearance. Start from the center and work outward for the most visually appealing pattern.
Solving Batter Separation Issues
Batter separation occurs when ingredients don’t properly combine. Cold cream cheese and eggs create lumps that resist blending smoothly. We bring all dairy ingredients to room temperature at least 2 hours before mixing.
Overmixing also causes separation by breaking down the protein structure in the cream cheese. Mix your batter just until ingredients combine and no streaks remain visible.
Preventing Sticking Problems
Pan preparation determines how easily your cheesecake releases after baking. Butter your springform pan thoroughly if you’re not using a graham cracker crust. We also recommend lining the bottom with parchment paper for extra insurance.
Graham cracker crusts need proper adherence to prevent sticking. Press the crust mixture firmly into the pan bottom and slightly up the sides before baking.
Managing Baking Time and Temperature
| Issue | Cause | Solution |
|---|---|---|
| Overbaking | Incorrect oven temperature | Check frequently during final 15 minutes |
| Uneven cooking | Temperature fluctuations | Avoid opening oven door repeatedly |
| Soggy bottom | Insufficient crust preparation | Pre-bake crust until golden |
Overbaking creates a dense texture and increases cracking risk. Your cheesecake should have a slight jiggle in the center when properly baked. We check our cheesecakes frequently during the last 15 minutes of baking time.
Opening the oven door too often disrupts consistent temperature and can cause sudden cooling that leads to surface cracks. Trust your timer and visual cues through the oven window when possible.
High-quality chocolate makes a important difference in both flavor and texture of your swirl. We invest in good baking chocolate rather than using chocolate chips or lower-grade alternatives for the best results.
Conclusion
We’ve equipped you with everything needed to master this show-stopping chocolate swirl cheesecake. From selecting the right ingredients to achieving those perfect marbled patterns this dessert will become your go-to for impressing guests.
The key lies in patience and attention to detail. Take your time with each step and don’t rush the cooling process. Your effort will be rewarded with a silky-smooth cheesecake that’s as beautiful as it is delicious.
Now it’s time to roll up your sleeves and create this masterpiece in your own kitchen. We’re confident you’ll love the results as much as your family and friends will enjoy every creamy chocolatey bite.
Frequently Asked Questions
What equipment do I need to make a chocolate swirl cheesecake?
You’ll need a 9-inch springform pan, food processor, stand or hand mixer, microwave-safe bowl, large roasting pan for water bath, silicone spatula, and parchment paper with non-stick spray. These tools ensure professional results, smooth texture, and easy removal from the pan.
How long should I chill the chocolate swirl cheesecake?
Chill the cheesecake for a minimum of 4 to 8 hours in the refrigerator for optimal results. This cooling time is essential for achieving the perfect creamy texture and allowing the flavors to develop properly.
Can I make chocolate swirl cheesecake ahead of time?
Yes, you can prepare the cheesecake up to three days in advance for optimal flavor development. The graham cracker crust can be made two days ahead, and the flavors actually improve during refrigeration as they meld together beautifully.
How should I store leftover chocolate swirl cheesecake?
Wrap the cheesecake in plastic wrap to prevent odor absorption and store in the refrigerator for up to one week. For longer storage, double wrap and freeze for up to three months. Always allow it to cool completely before refrigeration.
How do I prevent cracks in my cheesecake?
Use a water bath while baking to ensure even cooking and prevent cracking. Allow the cheesecake to cool gradually in the oven with the door slightly ajar for 30 minutes, then cool at room temperature before refrigerating.
What’s the best way to serve chocolate swirl cheesecake?
Let the cheesecake sit at room temperature for 15-20 minutes before slicing for optimal flavor and easier cutting. Serve with elegant toppings like whipped cream, drizzled chocolate, caramel sauce, or fresh berries to enhance presentation.
How do I achieve the perfect chocolate swirl pattern?
Create the swirl by dropping spoonfuls of chocolate mixture over the plain cheesecake batter, then use a knife to gently swirl through both batters in a figure-eight motion. Don’t overmix to maintain distinct marbled patterns.
What type of chocolate works best for the swirl?
Dark chocolate is recommended for the best flavor contrast and visual appeal. Melt it in a microwave-safe bowl and mix with a portion of the cheesecake batter to create the perfect consistency for swirling.


