

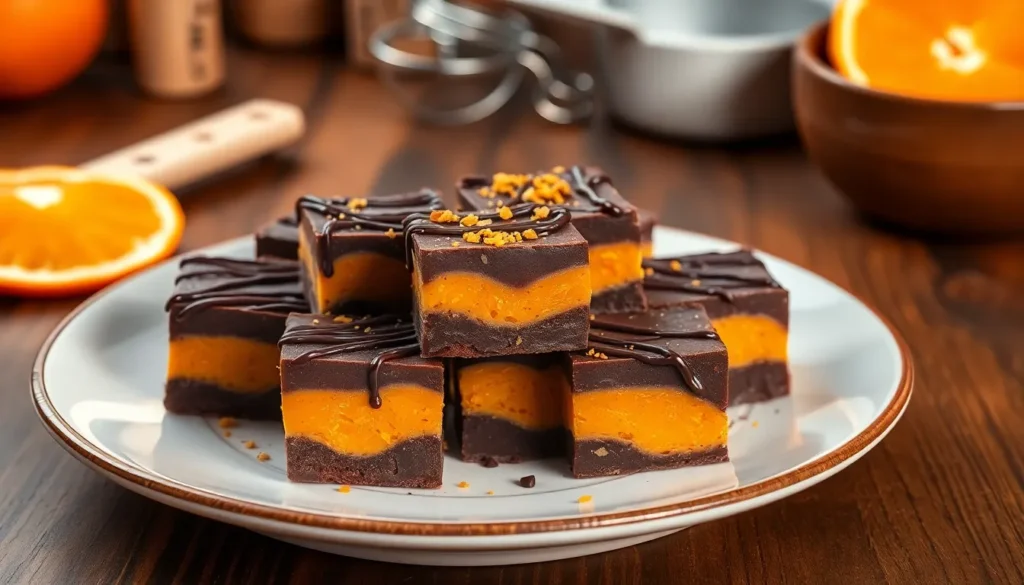
We’ve discovered the perfect marriage of rich chocolate and bright citrus in this irresistible chocolate orange fudge. This decadent treat combines the deep cocoa flavors you crave with the zesty freshness of orange that’ll make your taste buds dance.
There’s something magical about how chocolate and orange complement each other – it’s a classic pairing that transforms ordinary fudge into something extraordinary. Our recipe delivers that perfect balance where neither flavor overpowers the other, creating smooth, creamy squares that melt in your mouth.
Ingredients
Our chocolate orange fudge requires carefully selected ingredients to achieve that perfect balance of rich cocoa and bright citrus notes. We’ve organized these ingredients by layer to make preparation seamless and ensure every component shines.
For the Chocolate Base
- 12 oz dark chocolate chips (70% cocoa content preferred)
- 1 can (14 oz) sweetened condensed milk
- 4 tablespoons unsalted butter
- 1 teaspoon vanilla extract
- 1/4 teaspoon sea salt
- 2 tablespoons heavy cream
For the Orange Layer
- 8 oz white chocolate chips
- 1/2 can (7 oz) sweetened condensed milk
- 2 tablespoons unsalted butter
- 3 tablespoons fresh orange juice
- 2 tablespoons orange zest (from 2 large oranges)
- 1/4 teaspoon orange extract
- 3 drops orange food coloring (optional)
For Garnish and Toppings
- 1 tablespoon orange zest (for sprinkling)
- 2 oz dark chocolate (for drizzling)
- 1/4 cup candied orange peel (chopped)
- Pinch of flaky sea salt
Equipment Needed

Creating our chocolate orange fudge requires exact tools to ensure smooth preparation and professional results. We recommend gathering these essential items before beginning the recipe process.
Essential Baking Equipment:
- 8-inch square baking pan or glass dish for setting the fudge layers
- Microwave-safe bowls for melting chocolate and condensed milk mixtures
- Rubber spatula for mixing ingredients and smoothing fudge surfaces
- Nonstick cooking spray or parchment paper for easy removal
- Sharp knife for clean cutting once set
Measuring Tools:
- Measuring cups for accurate liquid ingredients
- Measuring spoons for extracts and smaller quantities
- Kitchen scale for precise chocolate measurements
Additional Helpful Items:
- Double boiler as an alternative to microwave melting
- Fine mesh zester for fresh orange zest
- Small offset spatula for creating smooth layers
- Refrigerator space for proper setting time
Our preparation becomes significantly easier when we line the baking pan with parchment paper extending over the edges. This technique creates convenient handles for lifting the finished fudge from the pan. We find that using a microwave-safe bowl large enough to accommodate stirring prevents messy spills during the melting process.
The spatula serves multiple purposes throughout our recipe. We use it for combining melted ingredients and spreading each layer evenly across the prepared pan. Having clean measuring tools ready streamlines the process and ensures accurate flavor balance between our chocolate and orange components.
Instructions

We’ll guide you through each step to create this decadent chocolate orange fudge with perfect layers and balanced flavors. Following our systematic approach ensures smooth preparation and professional results every time.
Prep the Pan and Ingredients
Line your 8×8 inch baking pan with parchment paper or lightly buttered foil for easy removal later. Gather all ingredients and measure them precisely before starting the melting process.
Place the dark chocolate chips and white chocolate chips in separate microwave-safe bowls. Divide the sweetened condensed milk according to your recipe proportions, keeping most for the chocolate layer. Set out the orange zest, orange extract, and any optional ingredients like food coloring within easy reach.
Make the Chocolate Layer
Combine the dark chocolate chips with the larger portion of sweetened condensed milk in your microwave-safe bowl. Heat the mixture in 20 to 30 second intervals, stirring thoroughly between each burst to prevent burning.
Continue heating and stirring until the chocolate melts completely and the mixture becomes smooth and glossy. The texture should flow easily from your spoon without any lumps. Remove the bowl from the microwave and set aside while you prepare the orange layer.
Prepare the Orange Layer
Place white chocolate chips with the remaining condensed milk in a clean microwave-safe bowl. Microwave using the same 20 to 30 second intervals, stirring between each heating period until completely smooth.
Stir in the orange extract and freshly grated orange zest, avoiding any bitter white pith. Add a few drops of orange food coloring if you want enhanced visual appeal. Mix until the orange flavor distributes evenly throughout the white chocolate base.
Assemble the Fudge
Pour the melted chocolate mixture into your prepared pan, spreading it evenly across the bottom. Use a rubber spatula to smooth the surface and eliminate any air bubbles.
Carefully pour the orange layer over the chocolate base, spreading gently to avoid mixing the layers. Create clean, distinct layers by pouring slowly and using light spreading motions. Smooth the top surface for an even finish.
Set and Chill
Refrigerate the assembled fudge for at least 1 hour until it feels firm to the touch. For best results, we recommend chilling for up to 4 hours before cutting into squares.
Remove the fudge from the refrigerator and lift it from the pan using the parchment paper edges. Cut into even squares using a sharp knife, wiping the blade clean between cuts for neat edges. Store covered in the refrigerator for up to 3 weeks.
Directions for Cutting and Serving

Once our chocolate orange fudge has chilled in the refrigerator until firm, we’re ready to transform it into perfect serving squares. We begin by removing the pan from the refrigerator and allowing the fudge to sit at room temperature for 5-10 minutes to make cutting easier.
Using the edges of our parchment paper as handles, we carefully lift the entire block of fudge from the pan. This technique prevents any sticking and ensures our fudge maintains its beautiful layered appearance. We place the lifted fudge block onto a clean cutting board for easier handling.
Sharp kitchen knife works best for achieving clean cuts through both chocolate and orange layers. We wipe the blade clean between cuts to prevent the layers from smearing together and maintain those distinct color contrasts we worked to create. Starting from one edge, we score light marks across the surface to guide our cutting lines before making the full cuts.
For standard serving portions, we cut the fudge into 1-inch squares, which yields approximately 64 pieces from our 8-inch pan. Larger 1.5-inch squares work well for gift giving and create about 25 generous portions. We make parallel cuts in one direction first, then rotate the cutting board and make perpendicular cuts to form perfect squares.
| Cut Size | Approximate Yield | Best For |
|---|---|---|
| 1-inch squares | 64 pieces | Individual servings |
| 1.5-inch squares | 25 pieces | Gift portions |
| 2-inch squares | 16 pieces | Sharing portions |
We serve our chocolate orange fudge chilled directly from the refrigerator for the best texture and flavor experience. Room temperature serving works well too, though the fudge will be slightly softer. Each piece should showcase both the rich chocolate base and the vibrant orange layer in perfect harmony.
For storage, we place the cut squares in an airtight container with parchment paper between layers to prevent sticking. Our fudge stays fresh in the refrigerator for up to three weeks, making it an excellent make-ahead dessert for entertaining or gift giving.
Storage Instructions

Proper storage ensures our chocolate orange fudge maintains its perfect texture and vibrant flavors for weeks. We recommend keeping the fudge at room temperature in an airtight container where it stays fresh for 2 to 4 weeks. This storage method preserves the ideal creamy consistency and allows the chocolate and orange flavors to remain perfectly balanced.
Room Temperature Storage
We always store our fudge pieces in airtight containers at room temperature for optimal results. The fudge maintains its best flavor profile and smooth texture when kept away from moisture and temperature fluctuations. Wrapping individual pieces tightly in wax paper prevents them from sticking together while preserving freshness.
Avoiding Refrigeration
Refrigerating chocolate orange fudge draws out moisture and compromises the desired creamy texture. We avoid placing fudge in the refrigerator as it can make the texture less appealing and alter the carefully balanced flavors. Room temperature storage consistently delivers superior results compared to cold storage methods.
Freezer Storage Options
Our chocolate orange fudge freezes beautifully for up to 3 months when stored properly. We place cut pieces in airtight containers with wax paper separating each layer to prevent sticking. This method allows us to prepare large batches ahead of time for special occasions or gift giving.
| Storage Method | Duration | Container Type | Special Notes |
|---|---|---|---|
| Room Temperature | 2-4 weeks | Airtight container | Best texture and flavor |
| Freezer | Up to 3 months | Airtight container | Separate pieces with wax paper |
| Thawing Process | 15-20 minutes | Room temperature | Transfer from refrigerator first |
Thawing Process
We transfer frozen fudge pieces to the refrigerator for initial thawing before bringing them to room temperature. The fudge needs 15 to 20 minutes at room temperature after refrigerator thawing to reach the perfect serving consistency. This gradual thawing process ensures the texture remains smooth and the flavors develop fully.
Quality Maintenance Tips
Lining storage containers with parchment paper prevents our fudge from sticking to container surfaces. We ensure all containers seal tightly to maintain freshness and prevent the fudge from absorbing other flavors. Plastic wrap provides an additional barrier when double wrapping pieces for extended storage periods.
Make-Ahead Tips

We love how chocolate orange fudge becomes an even better treat when prepared ahead of time. The flavors develop beautifully over several days, making advance preparation not just convenient but actually preferable for the best taste experience.
Traditional Fudge Preparation Timeline
Our chocolate orange fudge can be made up to two weeks in advance when stored properly. We recommend preparing the fudge at least 24 hours before serving to allow the flavors to fully meld together. The orange essence becomes more pronounced after the first day, creating that perfect balance we’re looking for.
| Preparation Timeline | Storage Method | Duration |
|---|---|---|
| 1-3 days ahead | Refrigerator | Up to 2 weeks |
| 1-4 weeks ahead | Freezer | Up to 3 months |
| Same day serving | Room temperature | 4-6 hours |
Quick Preparation Methods
We find that microwave preparation works exceptionally well for busy schedules. The chocolate and orange layers can be prepared in separate microwave-safe bowls, heated in 30-second intervals until smooth. This method reduces preparation time by half while maintaining the same rich texture and flavor profile.
Slow cooker preparation offers another convenient option during holiday periods. We melt the chocolate base on low heat for 1-2 hours, stirring occasionally, then proceed with the orange layer. This hands-off approach allows us to focus on other tasks while the fudge components develop their smooth consistency.
Freezer Storage Strategy
Freezing becomes our go-to method for long-term storage and gift preparation. We cut the fudge into serving squares before freezing, separating each piece with parchment paper to prevent sticking. Individual wrapping makes it easy to remove only the portions we need without thawing the entire batch.
The frozen fudge maintains its creamy texture for up to three months when stored in airtight containers. We allow frozen pieces to thaw gradually in the refrigerator for 2-3 hours before bringing to room temperature for optimal serving consistency.
Gift Packaging Preparation
We package our make-ahead fudge in cellophane bags or decorative tins for beautiful homemade gifts. The fudge holds its shape perfectly when cut into uniform squares, making presentation effortless. Refrigerated storage keeps the pieces firm and easy to handle during packaging.
For best results, we prepare gift packages 1-2 days before giving, storing them in the refrigerator until the last moment. This timing ensures the fudge maintains its fresh appearance and optimal texture when recipients enjoy their treat.
Variations and Substitutions

We love experimenting with different flavors and textures to create unique versions of our chocolate orange fudge. These substitutions allow you to customize the recipe based on your preferences or dietary needs.
Different Chocolate Options
Semi-sweet chocolate chips serve as the foundation for most traditional fudge recipes. We find they provide the perfect balance between sweetness and cocoa intensity that pairs beautifully with orange flavors. Dark chocolate elevates the recipe with its richer and deeper flavor profile while working exceptionally well in sugar-free versions. This option creates a more sophisticated taste that appeals to adults who prefer less sweetness.
Milk chocolate offers a sweeter and creamier alternative that children particularly enjoy. The milder cocoa flavor allows the orange notes to shine through more prominently. We recommend using high-quality chocolate chips regardless of your choice to ensure smooth melting and optimal texture.
Orange Flavor Alternatives
Orange extract delivers concentrated citrus flavor when fresh zest isn’t available. We typically use 1 teaspoon of extract to replace the zest from one medium orange. This option provides consistent flavor intensity throughout the fudge.
Dried orange peel works as an excellent substitute for fresh zest in most recipes. The concentrated oils in dried peel actually intensify during the cooling process. Orange juice or syrup can enhance the citrus profile when combined with other orange flavoring agents. We often add 2 tablespoons of fresh orange juice to brighten the overall taste.
Fresh orange zest remains our preferred choice because it provides the most vibrant flavor and aromatic oils that complement the chocolate base perfectly.
Add-In Ideas
Nuts transform the fudge’s texture while adding complementary flavors. Pecans offer a buttery richness that pairs naturally with both chocolate and orange. Almonds provide a subtle crunch that doesn’t overpower the delicate flavor balance. Walnuts contribute an earthy depth that creates complexity in each bite.
Marshmallow creme lightens the fudge’s consistency and adds a fluffy texture that melts on your tongue. We fold it in during the final mixing stage to maintain its airy quality. Cocoa powder intensifies the chocolate flavor when you want a more decadent result. Adding 2 tablespoons creates a deeper cocoa profile without affecting the fudge’s smooth texture.
Candied orange peel provides bursts of concentrated citrus flavor and an appealing visual contrast against the dark chocolate layers.
Troubleshooting Common Issues

Even experienced bakers encounter challenges when making chocolate orange fudge. We’ve compiled answers to the most common problems that can occur during preparation and setting.
Lumpy or Splitting Mixture
Overheating your chocolate mixture creates the most frequent issue in fudge making. When we heat chocolate too quickly or at temperatures that are too high the mixture separates and becomes grainy. Beat the mixture well with a rubber spatula to bring it back together. If this doesn’t work chill the mixture slightly in the refrigerator for 10-15 minutes then beat again vigorously.
We recommend using short 30-second intervals when melting chocolate in the microwave. Stir thoroughly between each interval to distribute heat evenly and prevent hot spots that cause splitting.
Fudge Not Setting Properly
Temperature and timing play crucial roles in achieving the perfect fudge consistency. Our fudge requires at least 2-3 hours in the refrigerator to set completely. If your fudge remains soft after this time check that your refrigerator temperature is below 40°F.
Insufficient cooling time often causes setting problems. We suggest allowing the fudge to chill overnight for the best results. The layers need time to firm up and develop their distinct textures.
Bitter Orange Flavor
Using dried orange zest or the white pith of orange rind creates an unpleasant bitter taste in your fudge. We always use fresh orange zest from the colored part of the peel only. The white pith beneath the colorful skin contains bitter compounds that overpower the sweet orange flavor.
Store-bought orange extract varies in quality and concentration. Start with less than the recipe calls for then taste and adjust accordingly. Fresh orange juice and zest provide the most balanced citrus flavor without overwhelming bitterness.
Layers Not Staying Separate
Pouring the orange layer too quickly onto hot chocolate causes the layers to blend together. We let the chocolate layer cool for 5-10 minutes before adding the orange mixture. This brief cooling period allows the bottom layer to begin setting while remaining warm enough for the top layer to adhere properly.
Temperature matching between layers also prevents mixing. Both layers should feel warm but not hot when you combine them. This creates distinct layers that showcase the beautiful contrast between chocolate and orange.
Texture Problems
Grainy texture often results from sugar crystallization during the melting process. We use sweetened condensed milk specifically to prevent this issue because it contains already dissolved sugars. Avoid substituting regular milk or cream which can cause crystallization problems.
Overmixing after adding orange zest can break down the mixture and create a dense heavy texture. Fold in zest gently with just enough mixing to distribute evenly throughout the layer.
Conclusion
We’ve created something truly special with this chocolate orange fudge recipe. The combination of rich chocolate and bright citrus creates a sophisticated treat that’s perfect for any occasion.
This recipe delivers professional results with simple techniques and readily available ingredients. Whether you’re preparing for holidays entertaining or creating thoughtful gifts the layers of flavor will impress everyone who tries it.
The best part? You can customize it to your heart’s content. Add nuts change up the chocolate type or experiment with different citrus variations to make it uniquely yours.
Now it’s time to get into the kitchen and create these irresistible squares of perfection. Your taste buds will thank you for this delightful adventure in homemade candy making.
Frequently Asked Questions
How long does chocolate orange fudge last?
Chocolate orange fudge can be stored at room temperature in an airtight container for 2-4 weeks. For longer storage, freeze cut pieces separated by wax paper for up to 3 months. Avoid refrigeration as it can compromise the creamy texture by drawing out moisture.
What ingredients do I need for chocolate orange fudge?
The chocolate layer requires dark chocolate chips, sweetened condensed milk, butter, vanilla extract, sea salt, and heavy cream. The orange layer needs white chocolate chips, condensed milk, butter, fresh orange juice, orange zest, and orange extract. Optional garnishes include candied orange peel and flaky sea salt.
Can I make chocolate orange fudge ahead of time?
Yes, chocolate orange fudge is perfect for make-ahead preparation. The flavors actually develop and improve over several days. Prepare the fudge at least 24 hours before serving for the best taste experience, making it ideal for entertaining or gift-giving.
What equipment do I need to make this fudge?
Essential equipment includes an 8-inch square baking pan, microwave-safe bowls, rubber spatula, nonstick spray or parchment paper, and a sharp knife. Measuring cups, spoons, and a kitchen scale are important for accuracy. Optional helpful tools include a double boiler and fine mesh zester.
How do I prevent my fudge layers from mixing together?
Allow the chocolate layer to cool slightly before adding the orange layer. Pour the orange mixture gently over the back of a spoon to distribute it evenly without breaking through the chocolate layer. Ensure both mixtures aren’t too hot when layering.
Why isn’t my fudge setting properly?
Fudge may not set due to insufficient cooling time, incorrect ingredient ratios, or overheating during preparation. Ensure proper measurements, use short melting intervals, and allow adequate refrigeration time (at least 3-4 hours). Check that your condensed milk hasn’t expired.
Can I substitute different types of chocolate?
Yes, you can use semi-sweet, milk, or different percentages of dark chocolate for varying flavor profiles. Semi-sweet provides balanced sweetness, while higher percentage dark chocolate offers more intense cocoa flavor. Adjust sweetness accordingly based on your chocolate choice.
How should I cut the fudge for clean pieces?
Let chilled fudge sit at room temperature for 5-10 minutes before cutting. Use parchment paper as handles to lift the block from the pan. Score the surface first, then cut with a sharp knife into 1-inch squares for individual servings.


