
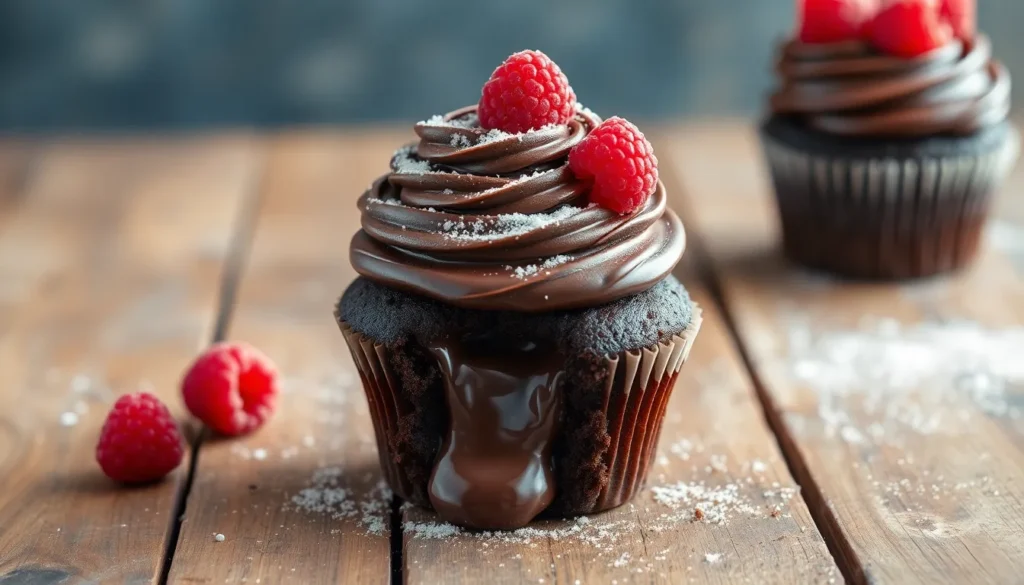
Chocolate lava cupcakes transform ordinary dessert into pure magic with their molten chocolate centers that flow like liquid gold when you break them open. We’ve perfected this restaurant-quality treat that’ll make your guests think you’re a professional pastry chef.
These individual desserts combine the best of both worlds – the convenience of cupcakes with the drama of traditional lava cakes. Each bite delivers rich chocolate cake followed by that signature warm chocolate center that’s become the hallmark of fine dining establishments worldwide.
What makes our recipe special is its foolproof technique that guarantees the perfect molten center every single time. We’ll show you exactly how to achieve that ideal balance between a fully baked exterior and gloriously gooey interior. Best of all these impressive treats come together in just 30 minutes making them perfect for last-minute dinner parties or whenever you’re craving something truly decadent.
Ingredients
We’ve carefully selected each ingredient to create the perfect balance between a tender cupcake base and that irresistible molten chocolate center. These premium ingredients work together to deliver restaurant-quality results in your home kitchen.
For the Cupcakes
- 1/2 cup all-purpose flour
- 1/4 cup unsweetened cocoa powder
- 1/2 cup granulated sugar
- 1/2 teaspoon baking powder
- 1/4 teaspoon salt
- 1/4 cup whole milk, room temperature
- 2 tablespoons vegetable oil
- 1 large egg, room temperature
- 1/2 teaspoon vanilla extract
For the Chocolate Lava Center
- 4 oz dark chocolate (70% cocoa), chopped
- 4 tablespoons unsalted butter
- 2 tablespoons heavy cream
- 2 tablespoons powdered sugar
- Pinch of salt
For the Chocolate Ganache Topping
- 3 oz semi-sweet chocolate, finely chopped
- 1/3 cup heavy cream
- 1 tablespoon unsalted butter, room temperature
- 1 tablespoon corn syrup
- Fresh raspberries for garnish (optional)
- Powdered sugar for dusting (optional)


Equipment Needed

Creating perfect chocolate lava cupcakes requires the right tools to achieve that coveted molten center and tender exterior. Our carefully selected equipment list ensures you’ll have everything necessary to execute this restaurant-quality dessert at home.
Standard Muffin Pan serves as the foundation for our lava cupcakes. This essential tool allows for even heat distribution and easy release, giving each cupcake its ideal shape and presentation. We recommend using a 12-cup capacity pan for consistent baking results.
Nonstick Cooking Spray prevents our delicate cupcakes from sticking to the muffin cups. This simple step eliminates the frustration of broken cupcakes and ensures clean removal every time. Thoroughly coating each cup creates a barrier between the batter and the pan surface.
Cocoa Powder doubles as both a release agent and decorative element when dusting the prepared muffin pan. We sprinkle it over the greased cups to add an extra layer of protection while improving the chocolate flavor profile of our finished cupcakes.
Whisk or Silicone Spatula enables efficient mixing of our batter components. These tools help us achieve the smooth, lump-free consistency essential for professional results. A silicone spatula particularly excels at scraping bowl sides and folding ingredients gently.
Stand Mixer (Optional) streamlines the preparation process when working with larger batches or recipes requiring extensive mixing. While not absolutely necessary, this appliance saves time and effort when creaming butter and sugar or whipping eggs to the proper consistency.
Double Boiler or Microwave-Safe Bowl facilitates melting chocolate for both the molten centers and ganache topping. We prefer the gentle, controlled heat of a double boiler for premium chocolate, though microwave heating works effectively with careful attention to prevent scorching.

Instructions

We’ll walk through each step to create these decadent chocolate lava cupcakes with perfectly molten centers. Follow our detailed process to achieve restaurant-quality results every time.
Prep the Cupcake Batter
We begin by melting our chocolate foundation using either low heat on the stovetop or microwave method. Combine the dark chocolate and butter in a microwave-safe bowl and heat in 30-second intervals until smooth.
Beat the eggs, granulated sugar, and vanilla extract in a mixer until the mixture becomes pale and doubles in volume. This process creates the light texture we need for our cupcakes.
Gradually pour the melted chocolate mixture into the egg mixture while continuing to beat. We want to incorporate these ingredients slowly to maintain the airy consistency.
Mix in the all-purpose flour, baking powder, and salt until just combined. Overmixing will result in dense cupcakes, so we stop as soon as the dry ingredients disappear into the batter.
Prepare the Lava Center
Cut our dark chocolate into small pieces that will serve as the molten centers. Each piece should be roughly the size of a large chocolate chip to ensure proper melting during baking.
We recommend using high-quality dark chocolate with at least 70% cocoa content for the most luxurious lava effect. Room temperature chocolate works best for easy insertion into the batter.
Assemble the Cupcakes
Line our standard muffin tin with paper liners and lightly spray with nonstick cooking spray. This double protection ensures easy removal after baking.
Divide the prepared batter evenly among the 12 muffin cups, filling each about halfway. We use an ice cream scoop for consistent portions.
Insert one piece of dark chocolate into the center of each cupcake, pressing it down slightly into the batter. Cover the chocolate completely by smoothing the remaining batter over the top.
Bake the Cupcakes
Preheat our oven to 375°F (190°C) for optimal results. We can alternatively use 325°F (165°C) for a gentler baking approach.
Bake for 10-11 minutes at the higher temperature or 25-30 minutes at the lower temperature. The tops should appear set while the centers remain slightly soft to the touch.
| Temperature | Baking Time | Result |
|---|---|---|
| 375°F (190°C) | 10-11 minutes | Quick bake with molten center |
| 325°F (165°C) | 25-30 minutes | Gentle bake with consistent texture |
Remove from oven and let cool in the pan for 2-3 minutes before transferring to a wire rack.
Make the Chocolate Ganache
Heat the heavy cream in a small saucepan over low heat until it begins to simmer. We watch carefully to prevent boiling, which can cause the cream to separate.
Remove the cream from heat and immediately pour it over our finely chopped dark chocolate in a separate bowl. Let the mixture sit for 2 minutes to allow the heat to melt the chocolate.
Stir the ganache mixture until it becomes smooth and glossy. The consistency should coat the back of a spoon when properly combined.
Final Assembly and Serving
Drizzle the warm chocolate ganache over each cooled cupcake using a spoon or squeeze bottle. We create decorative patterns for visual appeal.
Dust the finished cupcakes with powdered sugar or cocoa powder as desired. Fresh raspberries make an elegant garnish that complements the rich chocolate flavor.
Serve immediately while the centers remain molten, or store covered at room temperature for up to 2 days. We recommend gently warming stored cupcakes in the microwave for 10-15 seconds to restore the lava effect.
Baking Tips for Perfect Chocolate Lava Cupcakes

Essential Ingredient Selection
We recommend using dark or semi-sweet chocolate chips for the optimal molten filling that creates the signature lava effect. Quality chocolate makes a important difference in both flavor and texture.
Devil’s Food Cake Mix offers a convenient shortcut for busy bakers while maintaining rich chocolate flavor. Alternatively making the cake from scratch provides complete control over texture and taste.
Heavy whipping cream adds luxurious richness to our cupcakes and enhances the overall mouthfeel. This ingredient elevates the dessert from simple to extraordinary.
Vanilla extract brings depth to the chocolate flavor profile and balances the sweetness perfectly.
Proper Batter Preparation Techniques
Avoiding overmixing remains crucial for maintaining a tender crumb structure. We mix ingredients just until combined to prevent tough rubbery cupcakes.
Chocolate insertion technique requires placing a piece of chocolate directly into the batter before baking. This method ensures each cupcake contains a guaranteed molten center that flows beautifully when cut.
Pan preparation involves greasing our muffin tin thoroughly and dusting with cocoa powder instead of flour. This technique prevents sticking while adding an extra layer of chocolate flavor.
Critical Baking Parameters
| Temperature | Baking Time | Best Results |
|---|---|---|
| 325°F (165°C) | 20-30 minutes | Traditional cupcake texture |
| 425°F (218°C) | 8-10 minutes | Enhanced lava cake effect |
Temperature selection depends on our desired outcome. Lower temperatures at 325°F create cupcakes with reliable molten centers while higher heat at 425°F produces more dramatic lava flow similar to restaurant style ramekin cakes.
Doneness testing requires checking that tops appear set while centers remain slightly soft to the touch. We avoid overbaking which eliminates the molten effect entirely.
Professional Serving and Presentation
Cooling technique involves letting cupcakes rest briefly in the pan before transferring to prevent breaking. This short rest period allows structure to set while maintaining the liquid center.
Presentation enhancement includes dusting with powdered sugar or cocoa powder for an elegant finish. These simple touches create restaurant quality visual appeal.
Optimal serving temperature means enjoying cupcakes while still warm to experience the full molten chocolate flow. We serve immediately after cooling for maximum impact and flavor experience.
Storage Instructions

Once we’ve created these decadent chocolate lava cupcakes, proper storage ensures we can enjoy them at their peak quality. We recommend storing cooled cupcakes in an airtight container in the refrigerator for up to 3 to 5 days to maintain their freshness and prevent spoilage.
Refrigeration Storage
We place our completely cooled chocolate lava cupcakes in an airtight container before refrigerating. This method preserves both the texture and flavor while preventing the cupcakes from absorbing other refrigerator odors. Before serving refrigerated cupcakes, we allow them to come to room temperature for the best taste and texture experience.
Freezing Options
| Storage Method | Duration | Best Practices |
|---|---|---|
| Refrigeration | 3-5 days | Airtight container, room temp before serving |
| Freezing | Up to 3 months | Individual wrapping, freezer-safe container |
While certain chocolate lava cupcake varieties can be frozen for longer storage, we wrap each cupcake tightly and place them in a freezer-safe container or zip-top bag. Some lava cake types may experience texture changes when frozen, so we evaluate each recipe individually. For frozen cupcakes, we thaw them at room temperature before serving, and any frosting may need re-whipping if it becomes less fluffy after the freezing process.
Storage Best Practices
We ensure multiple cupcakes don’t touch each other during storage to prevent frosting smudging. In humid environments, we include parchment paper or a paper towel in the storage container to absorb excess moisture and maintain optimal texture. These simple precautions help preserve the quality of our chocolate lava cupcakes until we’re ready to indulge in their molten chocolate centers once again.
Variations and Substitutions

We love experimenting with chocolate lava cupcakes because they offer endless possibilities for customization. These variations allow you to create unique flavor profiles while maintaining that signature molten center we all crave.
Dark Chocolate Variations
Dark chocolate transforms these cupcakes into an intensely rich dessert experience. We recommend using high-quality dark chocolate with 60-70% cocoa content for the best results. Insert dark chocolate chips or pieces directly into the batter before baking to create additional pockets of molten goodness throughout each cupcake.
Coffee-Infused Options
Brewed coffee enhances the chocolate flavor and creates a sophisticated mocha twist. We add 2-3 tablespoons of strong brewed coffee to the batter for depth without overwhelming the chocolate taste. Cold brew concentrate works exceptionally well for this variation.
Sour Cream Enhancement
Sour cream delivers incredible moistness and introduces a subtle tangy note that balances the sweetness. We substitute 1/4 cup of sour cream for an equal amount of milk in our recipe. This addition creates a tender crumb texture that melts beautifully on the tongue.
Cake Mix Convenience
Devil’s food cake mix provides a shortcut without sacrificing quality. We use one standard box of devil’s food cake mix and follow the package directions while incorporating our molten chocolate center technique. This approach cuts preparation time in half while delivering consistent results.
Pudding Mix Addition
Chocolate fudge pudding mix amplifies the chocolatey flavor and adds extra moisture. We incorporate one small box of instant chocolate pudding mix into our dry ingredients. This substitution creates an incredibly rich flavor profile that dessert lovers find irresistible.
Alternative Filling Options
Chocolate fudge dessert topping creates a smoother molten center than traditional chocolate chips. We use 2 tablespoons of fudge topping per cupcake for a silky texture that flows perfectly when the cupcake is cut. This option eliminates any grittiness that sometimes occurs with chocolate chips.
Pan Preparation Techniques
We coat cupcake pans with melted butter and dust with cocoa powder instead of using standard cooking spray. This method ensures easy release while adding an extra layer of chocolate flavor to the exterior. The cocoa powder creates an attractive chocolatey crust that enhances both presentation and taste.
Temperature and Timing Adjustments
Baking at 325°F for 25-30 minutes produces the perfect molten center without overcooking the edges. We find this lower temperature allows the exterior to set properly while keeping the interior gloriously gooey. Higher temperatures often result in completely cooked centers rather than the desired molten effect.
Conclusion
These chocolate lava cupcakes represent the perfect fusion of simplicity and sophistication that we’ve all been searching for. With our foolproof technique and carefully selected ingredients you’ll create restaurant-quality desserts that consistently deliver that coveted molten center.
We’ve equipped you with everything needed to master this impressive treat – from essential equipment recommendations to storage answers that preserve quality for days. The versatility we’ve outlined means you can customize these cupcakes to match any occasion or dietary preference.
Whether you’re hosting an elegant dinner party or satisfying a spontaneous chocolate craving these cupcakes deliver every time. The combination of convenience and luxury makes them an invaluable addition to your dessert repertoire that’ll have everyone asking for your secret.
Frequently Asked Questions
How long do chocolate lava cupcakes take to make?
These chocolate lava cupcakes can be prepared and baked in just 30 minutes, making them perfect for quick dessert preparations. The entire process includes mixing the batter, preparing the molten center, assembling, and baking. This quick timeline makes them ideal for last-minute dinner parties or when you’re craving an indulgent dessert without lengthy preparation time.
What ingredients do I need for the molten chocolate center?
The molten chocolate center requires dark chocolate, unsalted butter, heavy cream, powdered sugar, and a pinch of salt. For best results, use high-quality dark chocolate as it provides the richest flavor and perfect consistency. These ingredients create the signature gooey interior that makes chocolate lava cupcakes so irresistible and luxurious.
What equipment is essential for making chocolate lava cupcakes?
You’ll need a standard muffin pan for even heat distribution, nonstick cooking spray, cocoa powder for dusting, and basic mixing tools like a whisk or silicone spatula. A double boiler or microwave-safe bowl is recommended for melting chocolate, with double boilers preferred for gentle, controlled melting that ensures the best quality results.
What are the two baking temperature options for perfect molten centers?
The article mentions two specific baking temperature options to achieve the ideal molten center texture. The exact temperatures depend on your desired consistency – one option creates a more liquid center while the other produces a slightly firmer but still gooey interior. Both methods ensure the exterior is fully baked while maintaining that coveted molten core.
How should I store leftover chocolate lava cupcakes?
Store cooled cupcakes in an airtight container in the refrigerator for 3-5 days. For longer storage, wrap individually and freeze in a freezer-safe container for up to 3 months. Use parchment paper between cupcakes to prevent frosting from smudging, and in humid environments, add parchment paper to absorb excess moisture and maintain quality.
Can I make substitutions to customize the recipe?
Yes, you can customize these cupcakes in many ways. Add brewed coffee for a mocha flavor, incorporate sour cream for extra moisture, or use devil’s food cake mix as a shortcut. Alternative fillings like chocolate fudge dessert topping work well for a smoother molten center. High-quality dark chocolate enhances the overall richness and flavor profile.
How do I know when the cupcakes are perfectly baked?
The key is achieving a balance between a fully baked exterior and gooey interior. The article provides specific doneness testing techniques and emphasizes proper cooling methods. The cupcakes should have a set exterior while maintaining that signature molten center. Following the recommended baking times and temperatures ensures optimal results.
Should chocolate lava cupcakes be served immediately?
Yes, these cupcakes are best served warm immediately after baking for the optimal molten effect. The gooey chocolate center is at its peak consistency when warm. However, they can be stored and reheated later if needed, though the immediate serving experience provides the most luxurious and authentic chocolate lava cake sensation.


